Making your refrigerator look built-in can transform your kitchen. A built-in look brings a sense of luxury and order, even if you’re working with a standard freestanding fridge. Many homeowners dream of this style, but they worry it’s expensive or needs a total kitchen remodel.
The truth is, with careful planning and the right techniques, almost any refrigerator can blend seamlessly with your cabinetry. You don’t need a contractor or designer for every step—many options are DIY-friendly, affordable, and practical.
This guide breaks down the entire process, from simple tricks to advanced solutions. Whether you’re a renter looking for quick changes or a homeowner interested in a permanent upgrade, you’ll find strategies that fit your needs and budget. Along the way, you’ll discover ideas you may not have considered, plus common mistakes to avoid.
Let’s dive in and turn your standard fridge into a stunning, built-in feature.
Why Make Your Refrigerator Look Built-in?
Many kitchens have refrigerators that stick out awkwardly. This can make the space look cluttered or unfinished. Creating a built-in look solves several problems:
- Visual harmony: The fridge blends with cabinets, creating a clean line.
- Increases home value: A built-in appearance feels high-end, attracting buyers.
- Maximizes space: Built-in designs can help kitchens feel bigger and more organized.
- Easier cleaning: Fewer gaps around the fridge mean less dust and fewer lost items.
A built-in look doesn’t only mean style—it often means smarter, more efficient use of your kitchen.
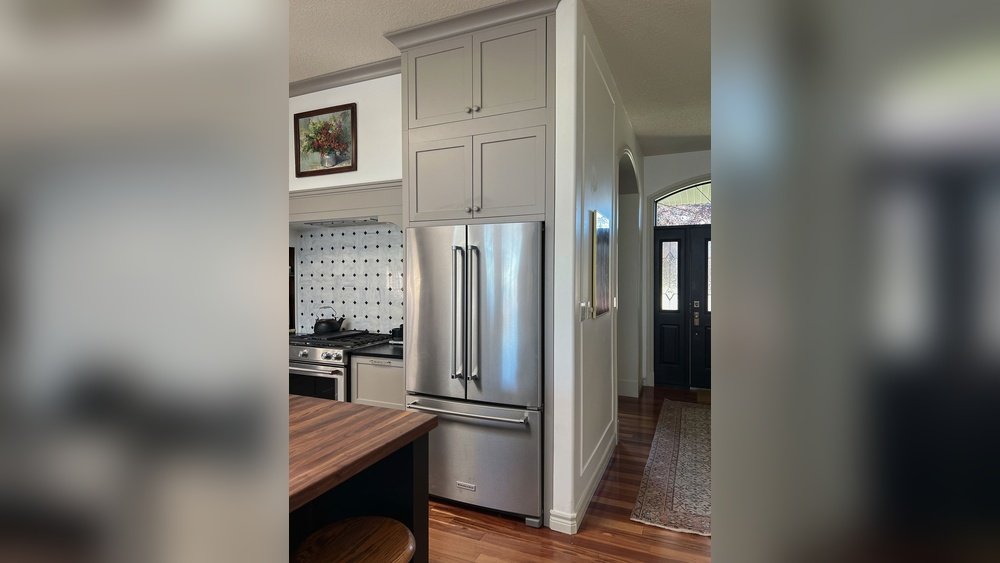
Understand The Built-in Refrigerator Look
Before you begin, it helps to understand what “built-in” really means. A true built-in refrigerator is installed flush with your cabinets and is often covered with custom panels that match the rest of your kitchen. These fridges are typically expensive and require special installation.
However, you can recreate most of this effect with a standard fridge.
There are three main ways to achieve this look:
- Cabinet panels: Adding panels or trim around your fridge.
- Boxing in: Building a cabinet or enclosure to frame your refrigerator.
- Counter-depth refrigerators: Using a fridge that aligns with cabinet depth.
You don’t have to do all three. Even one or two changes can make a big impact.

Credit: refrigeratortrimkits.com
Assess Your Refrigerator And Kitchen
Before making any changes, you need to understand your current kitchen setup.
- Measure your fridge: Height, width, and depth are all important. Standard fridges often stick out past cabinets by 4–8 inches.
- Check the fridge’s location: Is it against a wall, in an alcove, or at the end of a cabinet run?
- Look at surrounding cabinets: Is there space above or beside the refrigerator? Are there upper cabinets over the fridge?
- Consider airflow: Refrigerators need space for air to circulate, or they may overheat.
Taking measurements and photos will help you plan the right solution and avoid costly mistakes.
Different Ways To Make Your Refrigerator Look Built-in
Every kitchen is different, so you’ll need to choose the approach that fits your space, budget, and DIY skills. Here are the main strategies, from simple to more advanced.
1. Install Side Panels
Building panels on either side of your fridge can frame it, making it look like part of the cabinetry.
- Materials: Use MDF, plywood, or pre-made cabinet panels.
- Attach panels: Secure them to the wall and floor, not the refrigerator.
- Paint or finish: Match the panels to your cabinets for a seamless look.
This is a popular solution because it’s affordable and works with most kitchens. For best results, the panels should reach all the way from floor to ceiling and be at least as deep as your fridge.
2. Add A Top Cabinet
If there’s empty space above your refrigerator, install a cabinet above it. This not only adds storage, but visually pulls the fridge into your cabinetry “line. ”
- Measure carefully: The cabinet should fit tightly above the fridge.
- Choose the right height: Leave at least 1 inch of space above for ventilation.
- Match your cabinets: Use the same door style and finish.
Many cabinet shops sell “refrigerator cabinets” designed for this purpose. If your ceilings are high, you can stack two cabinets for a custom look.
3. Use Trim Molding
Adding trim molding around the fridge area can hide gaps and make the whole setup look intentional.
- Crown molding: Great for tying the fridge into upper cabinets.
- Side trim: Covers any small spaces between panels and the fridge.
- Baseboard molding: Completes the look at the floor.
Trim is affordable, and you can paint it to match your cabinets. Molding also helps hide any uneven cuts or small mistakes.
4. Build A Refrigerator Enclosure
For a fully custom look, you can build a box or enclosure around your refrigerator. This is more advanced but creates a true built-in effect.
- Construct sides and a top: Use sturdy materials like plywood.
- Leave clearance: Make sure to leave enough space for the fridge to slide in and for air to flow.
- Finish and paint: Match the enclosure to your kitchen style.
This solution works best for homeowners willing to invest some time and effort. Done well, it can be hard to tell the difference between a freestanding and a built-in fridge.
5. Use A Counter-depth Refrigerator
A counter-depth refrigerator is shallower than standard models, usually about 24–27 inches deep (excluding handles). This means it sits nearly flush with your cabinets.
- Upgrade benefit: Instantly gives a built-in look with no extra work.
- Downside: Less storage capacity and often higher price.
If you’re replacing your fridge anyway, consider switching to a counter-depth model for the most seamless look.
6. Apply Cabinet Panels To The Fridge
Some refrigerators allow you to attach custom panels directly to the doors. This makes the fridge almost invisible.
- Panel-ready models: These are designed for easy panel installation.
- Standard fridges: Some can be modified, but not all.
- Professional help: You may need a carpenter for perfect results.
This method is usually found in high-end kitchens, but it’s possible to DIY with the right tools and a compatible fridge.
7. Paint Or Wrap The Fridge
If you can’t add panels, painting your fridge or using a vinyl wrap can help it blend in.
- Paint: Use appliance paint in a color that matches your cabinets.
- Vinyl wraps: These come in many patterns, including wood grain or stainless steel.
- Prep work: Clean and sand the surface for best results.
This is one of the fastest and most affordable changes, but it won’t hide the shape of the fridge—just helps it match your kitchen’s style.
8. Build A Refrigerator Alcove
If you’re remodeling, consider building a niche or alcove for your fridge. This is a small “room” that the fridge slides into.
- Custom framing: Requires basic carpentry skills.
- Insulation: Add insulation if the alcove is on an exterior wall.
- Finish edges: Use trim or panels for a clean look.
This approach is popular in new builds, but you can sometimes add an alcove during a renovation.
9. Use Filler Strips
Filler strips are narrow pieces of wood that fill small gaps between the fridge and cabinets.
- Custom fit: Cut to the right size and paint to match.
- Hide uneven gaps: Great for older homes where walls aren’t perfectly straight.
Filler strips are an easy detail that can make a big difference in the final look.
10. Hide The Fridge With A Curtain Or Sliding Door
For a truly unique approach, you can use a curtain or install a sliding door to cover your fridge.
- Curtains: Choose a heavy fabric that matches your decor.
- Sliding doors: Barn door hardware works well for a modern or rustic look.
- Easy to remove: Good for renters or anyone who likes to change styles.
This is a creative solution, but it may not be for everyone. It’s best in informal kitchens or studios.
Planning Your Built-in Refrigerator Project
A successful project starts with a good plan. Here’s how to get ready:
- Budget: Costs range from under $100 (paint, trim) to $2,000+ (custom cabinetry).
- Tools and skills: Some methods are DIY-friendly, others may need a carpenter.
- Timeline: Simple upgrades take a weekend; full enclosures may need a few weeks.
- Permits: Most projects don’t require permits, but check local building codes for major renovations.
- Future needs: If you plan to replace your fridge soon, design for a standard size to avoid problems.
Measure everything twice and sketch your idea on paper before buying materials.
Comparison: Freestanding Vs. Built-in Vs. Counter-depth Refrigerators
Choosing the right refrigerator is a big part of the built-in look. Here’s a side-by-side comparison:
| Feature | Freestanding | Counter-Depth | Built-In |
|---|---|---|---|
| Depth | 30–36 inches | 24–27 inches | 24–25 inches |
| Price Range | $700–$2,500 | $1,500–$4,000 | $5,000–$10,000+ |
| Installation | Plug and play | Simple, may need cabinet adjustment | Professional install needed |
| Capacity | 18–30 cu. ft. | 15–25 cu. ft. | 15–25 cu. ft. |
| Built-In Look | Requires modifications | Flush with cabinets | Fully integrated |
If you’re not ready for a full built-in, a counter-depth fridge plus panels is a smart compromise.
Step-by-step Guide: How To Make Your Refrigerator Look Built-in
Let’s walk through a practical example: framing a standard fridge with panels and a top cabinet. This is one of the most popular DIY solutions.
Step 1: Measure Your Space
- Measure fridge width, height, and depth.
- Measure the space from floor to ceiling and from the side walls to the fridge.
- Check for outlets, vents, or obstacles.
Step 2: Plan The Built-in Look
- Decide on panel thickness (usually 3/4 inch).
- Sketch the layout including side panels and top cabinet.
- Choose colors and materials that match your kitchen.
Step 3: Buy Materials
You will need:
- Two side panels (MDF or plywood, cut to size)
- One top cabinet (or build a custom box)
- Trim molding (for finishing edges)
- Paint or finish to match cabinets
- Screws, brackets, and basic tools
Step 4: Install Side Panels
- Attach L-brackets to the wall and floor.
- Secure panels to the brackets—never to the fridge itself.
- Check for level and adjust as needed.
Step 5: Install Top Cabinet
- Mount the cabinet above the fridge using cabinet screws.
- Anchor to wall studs for safety.
- Leave at least 1 inch of space above the fridge for airflow.
Step 6: Add Trim And Finish
- Install trim molding to cover any seams or gaps.
- Caulk and paint for a seamless look.
- Clean up and check for stability.
Your refrigerator should now look almost completely built-in.
Table: Cost Breakdown For Diy Built-in Refrigerator Look
Here’s an approximate price guide for materials:
| Item | Low Cost | High Cost |
|---|---|---|
| Side Panels (MDF/Plywood) | $40 | $150 |
| Top Cabinet | $90 | $400 |
| Trim Molding | $15 | $60 |
| Paint/Finish | $20 | $60 |
| Hardware (Brackets, Screws) | $10 | $30 |
| Total | $175 | $700 |
Remember, labor costs can add $500–$2,000 if you hire a carpenter.
Advanced Tips For A Flawless Built-in Look
Beginners often miss these details, but they make a big difference:
- Ventilation: Always leave enough space above, behind, and beside your fridge. Most manufacturers recommend at least 1 inch on all sides.
- Toe kick: Match the base of your fridge enclosure to your cabinet’s toe kick for a professional look.
- Power and water access: Plan for easy access to outlets and water lines (for ice makers).
- Future upgrades: Leave a little extra space so you can replace the fridge later without rebuilding everything.
- Lighting: Consider adding under-cabinet lights or LED strips inside the enclosure.
Skipping these steps can lead to overheating, difficult repairs, or a look that’s clearly “homemade. ”
Mistakes To Avoid
Many people make similar errors when trying to fake a built-in fridge. Watch out for these:
- Panels too thin: Wobbly panels look cheap and may not support upper cabinets.
- No ventilation: Blocking airflow can shorten your fridge’s life.
- Poor color match: Slightly off paint or wood tones stand out more than you think.
- Unstable cabinets: Secure everything to wall studs for safety.
- Blocking doors: Leave enough space for the fridge doors to open fully.
If you’re not confident with tools or measurements, ask a handy friend for help or consult a pro.
When To Hire A Professional
Some projects are simple, but others require experience. Consider hiring a carpenter if:
- You want custom cabinetry or heavy panels.
- You need electrical or plumbing moved.
- Your fridge is extra large or has special ventilation needs.
- You want a perfect, high-end finish.
A professional can save you time and headaches, especially if your kitchen has unusual dimensions.
Alternatives For Renters Or Temporary Solutions
Not everyone can build panels or cabinets, especially in a rental. Here are some renter-friendly ideas:
- Removable vinyl wraps: Change the fridge’s color without paint.
- Tension rod curtains: Hide the fridge with no drilling.
- Stick-on trim: Add peel-and-stick molding for a quick upgrade.
- Magnetic covers: Use magnets to attach thin panels or fabric.
These changes are easy to undo when you move out.
Credit: erinzubotdesign.com
How A Built-in Fridge Look Affects Home Value
A built-in look is a top feature in many real estate listings. Homes with seamless kitchens often sell faster and for more money. According to the National Association of Realtors, kitchen updates can return 60–80% of their cost when selling a home. Even a DIY built-in fridge project can impress buyers and make your kitchen feel more custom.
Examples And Case Studies
Example 1: Small Kitchen, Big Impact
A homeowner in a 120-square-foot kitchen added MDF side panels and a top cabinet above their standard fridge. Total cost: $350. The fridge now looks like it was always part of the kitchen, and the space feels much bigger.
Example 2: High-end Remodel
A family remodeling their kitchen chose a panel-ready refrigerator, custom side panels, and matching upper cabinets. The project cost $2,800 (including carpentry), but the kitchen now looks like a designer space.
Example 3: Renter Solution
A renter used a wood-look vinyl wrap and a tension rod curtain to cover their white fridge. The total cost was under $50 and didn’t damage the apartment.
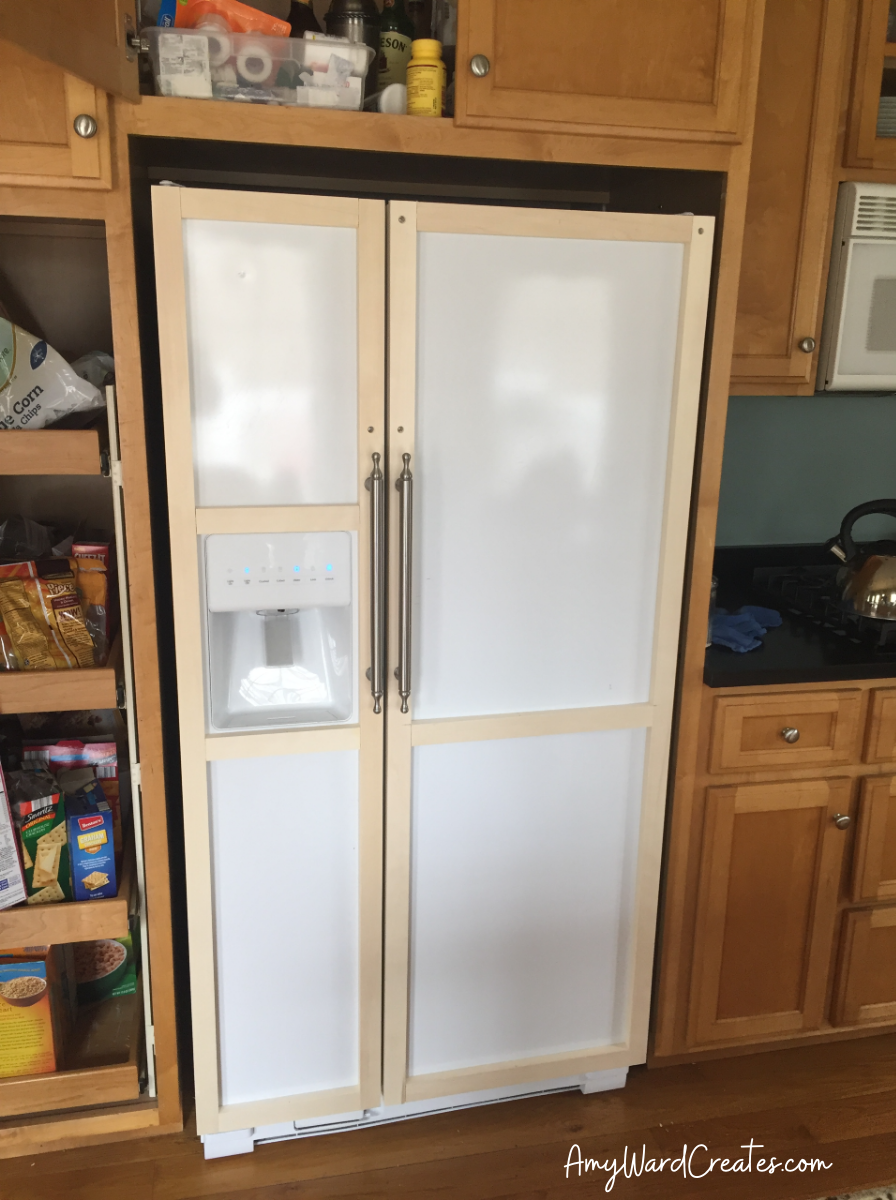
Credit: amywardcreates.com
Quick Reference: What Not To Do
- Don’t block the fridge’s ventilation.
- Don’t glue or screw anything directly to the refrigerator.
- Don’t skip the finishing details (trim, paint, caulk).
- Don’t use flammable materials near the compressor.
- Don’t forget to measure twice.
These mistakes can lead to costly repairs or unsafe conditions.
Where To Find Inspiration
For more ideas and examples, browse interior design magazines, home improvement websites, or Pinterest. You’ll find hundreds of styles, from modern to farmhouse. You can also explore resources like the Houzz Magazine for in-depth kitchen design trends.
Frequently Asked Questions
How Much Space Should I Leave Around My Refrigerator For Ventilation?
Most manufacturers recommend at least 1 inch of space on all sides (top, back, and both sides) for proper airflow. Always check your fridge’s manual for specific requirements. Insufficient ventilation can cause overheating and reduce the life of your appliance.
Can I Use Any Type Of Paint On My Refrigerator?
No, you should use appliance paint or high-quality spray paint designed for metal surfaces. Regular wall paint may not stick or could peel over time. Clean and sand the surface before painting for the best results.
What If My Refrigerator Is Much Deeper Than My Cabinets?
If your fridge sticks out several inches, consider installing deeper side panels or using a counter-depth refrigerator. You can also use trim molding and clever design tricks (like matching color) to minimize the visual difference.
Is It Possible To Remove Built-in Panels If I Move Or Get A New Fridge?
Yes, most panels and trim can be removed with minimal damage if they are attached to the walls and floor—not the fridge itself. Always design your enclosure to allow for future upgrades or repairs.
Will Making My Fridge Look Built-in Void My Warranty?
Usually, cosmetic changes like panels or paint do not void your warranty, as long as you don’t block ventilation or modify the appliance itself. However, drilling into the fridge or blocking vents can affect your warranty. Always check your user manual and warranty terms before starting.
Transforming your refrigerator into a built-in feature is a smart way to update your kitchen. With careful planning, the right materials, and attention to detail, you can achieve a seamless look that adds style and value to your home—without the cost of a full remodel.
Whether you choose a simple paint job or a full enclosure, your kitchen will thank you for the upgrade.