Making homemade ice cream is a joy—creamy, flavorful, and customizable. Many home cooks dream about it, but worry it’s too hard. The Kitchenaid Ice Cream Maker attachment changes everything. It’s not just for experts; anyone can use it. With this tool, you don’t need a separate ice cream machine. Instead, you connect it to your Kitchenaid stand mixer and create frozen desserts at home.
This guide will show you how to use the Kitchenaid Ice Cream Maker step by step. You’ll learn how to prepare your first batch, get smooth results, and avoid mistakes that frustrate beginners. We’ll also cover cleaning, storage, and troubleshooting. Whether you want classic vanilla, dairy-free treats, or something adventurous, you’ll find everything you need here. By the end, you’ll feel confident to make ice cream for family and friends—no guesswork, just pure fun.
Understanding The Kitchenaid Ice Cream Maker
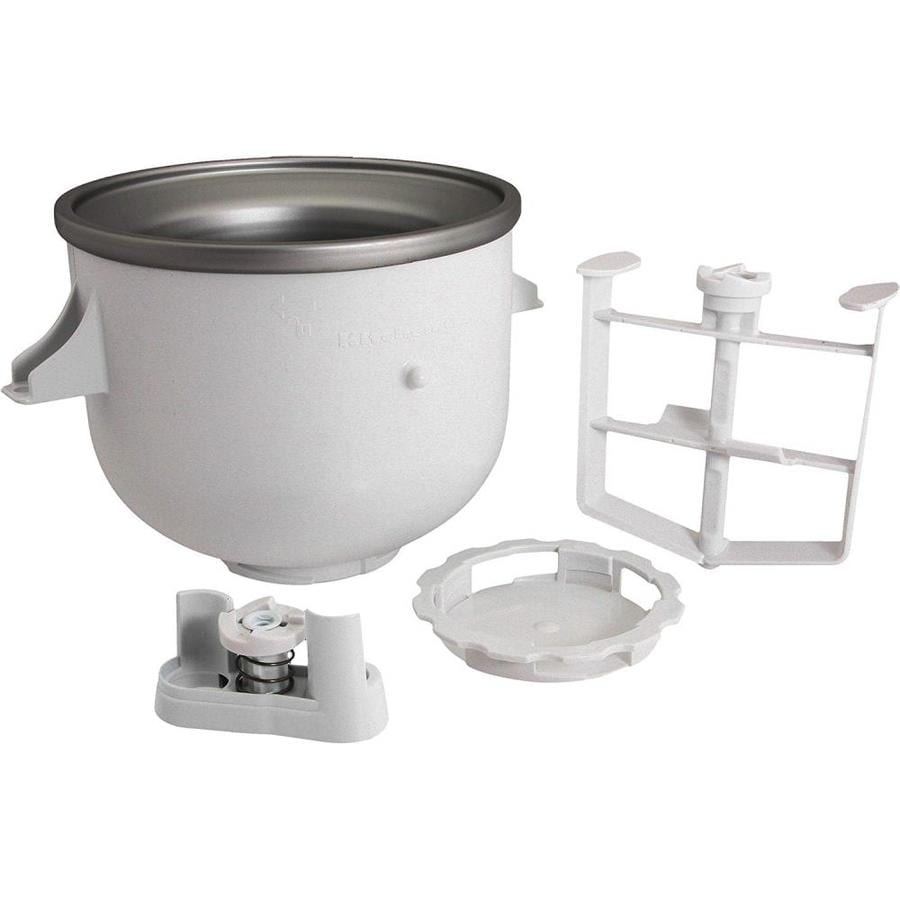
The Kitchenaid Ice Cream Maker is an attachment for Kitchenaid stand mixers. It lets you churn up to 2 quarts of ice cream, gelato, sorbet, or frozen yogurt. The main parts include:
- Freeze bowl: A double-walled bowl with a liquid inside that freezes solid.
- Dasher: A paddle that mixes and scrapes the ice cream.
- Drive assembly: Connects the dasher to the mixer.
Unlike standalone ice cream machines, this attachment is powered by your mixer. You don’t need extra motors or electricity—just your existing appliance. It’s compact, easy to clean, and stores in your freezer. If you already use your Kitchenaid mixer for baking, this attachment means you don’t need another bulky appliance cluttering your kitchen.
It’s a smart investment for people who want versatility without sacrificing space.
Key Features
- Capacity: Holds up to 2 quarts (about 1.9 liters), which is enough for a family or a small party.
- Compatibility: Fits most Kitchenaid stand mixers (check your model before buying to avoid frustration).
- Versatility: Makes ice cream, gelato, sorbet, frozen yogurt, and even frozen cocktails if you like.
- No salt or ice needed: The bowl provides cold for churning, which means less mess and no extra cost for rock salt or bags of ice.
A subtle benefit: because the bowl is wide and open, it’s easier to add ingredients or check the texture compared to some machines with narrow spouts.
How It Works
The bowl must be frozen before use. Once frozen, you pour in your mixture, start the mixer, and the dasher churns it into ice cream. The slow mixing creates a creamy texture by adding air and preventing ice crystals. The bowl’s cold walls freeze the mixture evenly, so you get a smooth result. The dasher’s design keeps everything moving, scraping the sides and bottom so nothing sticks or forms icy clumps.
Why Use This Attachment?
Some reasons people prefer the Kitchenaid attachment:
- No separate machine: Save counter space and money by using your stand mixer for more than one job.
- Consistent results: Your stand mixer provides steady power, unlike hand-cranked or less reliable electric machines.
- Easy to clean: Fewer parts than many standalone units, and no hard-to-reach spots.
- Multi-use: Switch from baking to ice cream in minutes—great for parties or busy cooks.
Another bonus: if you already trust your Kitchenaid mixer for bread or cakes, you know it’s built to last. This attachment uses the same quality.
Preparing For Your First Batch
Getting ready is easy, but a few steps are essential for success. Rushing these steps is the main reason for ice cream that doesn’t set or tastes icy.
Freezing The Bowl
The most important step is freezing the bowl—without this, you can’t make ice cream. Place the freeze bowl in the coldest part of your freezer, with the open side up. Leave it for at least 15 hours (overnight is best). The cooling liquid inside must freeze solid.
Pro tip: Some freezers aren’t cold enough. The bowl should be 0°F (-18°C) or colder. If you hear sloshing when you shake it, it’s not frozen. If your freezer is packed, make sure there’s air flow around the bowl so it freezes evenly. Some people keep the bowl in the freezer all the time, so it’s always ready for a spontaneous batch.
Gathering Ingredients
Start simple. For classic ice cream, you’ll need:
- Whole milk (2 cups)
- Heavy cream (2 cups)
- Sugar (3/4 cup)
- Vanilla extract (1 tablespoon)
- Pinch of salt
Choose high-quality ingredients. Fresh cream and pure vanilla make a big difference in flavor. If you want to try new flavors, look for recipes with similar ratios—this ensures the ice cream freezes properly.
Pre-chill The Mixture
For best results, mix your ingredients and chill them in the refrigerator for several hours before churning. Cold mixture freezes faster and gives a smoother texture. If you’re making a custard base (with eggs), cook it, strain it, and chill completely before using.
Warm mix will melt the bowl’s cold quickly and produce ice crystals.
Setting Up Your Workspace
Clear a space near your mixer. Have a spatula, measuring cups, and a container for finished ice cream ready. Work quickly—once the bowl leaves the freezer, it starts warming up. Keep your mix-ins prepped and nearby, so you can add them at the right time.
Lay out a clean towel in case of spills.
Example: If you’re making chocolate chip ice cream, have the chips measured and ready in a small bowl so you don’t waste time.

Credit: www.youtube.com
Assembling The Kitchenaid Ice Cream Maker
Proper assembly avoids frustration and messes. Follow these steps:
- Attach the bowl: Place the frozen bowl onto the mixer’s base, locking it in place.
- Connect the dasher: Insert the dasher into the bowl. It should sit loosely—don’t force it down.
- Install drive assembly: Fit the drive assembly over the mixer’s motor head. It will engage the dasher.
- Secure everything: Lower the mixer’s head or secure the bowl, depending on your model. Double-check all parts are attached.
Non-obvious insight: Always start the mixer before pouring in the mixture. This prevents the mix from freezing to the bowl sides instantly.
If you struggle to attach the parts, double-check your model and the user manual. Each model has small differences in how the bowl or drive assembly fits. Taking a moment to read the instructions saves time and keeps your attachment safe.
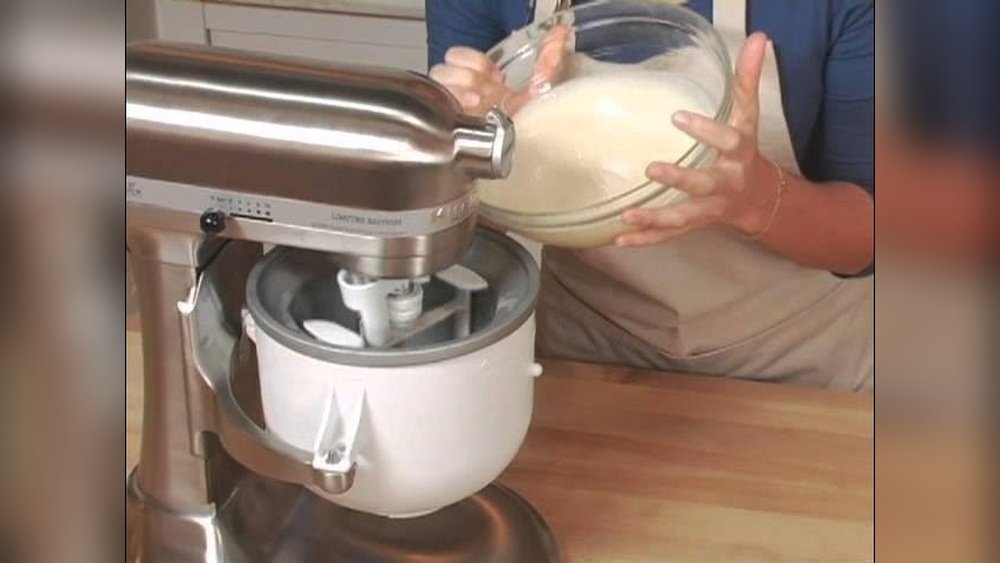
Churning Your Ice Cream
Now for the fun part—turning liquid into creamy ice cream.
Step-by-step Churning
- Start the mixer: Set it to the “stir” or lowest speed. Higher speeds can cause splashing or damage the drive assembly.
- Pour in the mixture: With the dasher spinning, slowly pour your chilled mix into the bowl.
- Churn for 20–30 minutes: Watch the texture. The ice cream thickens and rises up the dasher. If your base is very cold, it may freeze faster.
- Check for readiness: When it looks like soft serve, it’s done. The mixer may struggle if it gets too thick.
If you’re making a batch on a hot day, your ice cream may churn faster or slower depending on room temperature. Watch closely the first time so you don’t over-churn and freeze the ice cream solid in the bowl.
Tips For Great Results
- Don’t overfill. Stick to 2 quarts or less. Too much mix prevents proper freezing.
- If your kitchen is warm, work quickly so the bowl stays cold.
- Add mix-ins (chocolate chips, fruit, nuts) in the last few minutes.
- Use a rubber spatula to scrape the bowl for maximum yield at the end.
Non-obvious insight: If your ice cream gets stuck to the bowl sides, let it sit a minute, then use a plastic or silicone spatula to loosen it. Never use metal.
Texture Expectations
Freshly churned ice cream is soft serve. For harder scoops, transfer to a container and freeze 2–4 more hours. If you prefer scoopable ice cream straight from the freezer, add a tablespoon of alcohol (like vodka) or corn syrup to the base next time. This keeps it softer.
Common Churning Problems
- Ice cream isn’t thickening: Bowl not cold enough, mixture too warm, or overfilled.
- Ice crystals: Mixture wasn’t cold, or you took too long pouring it in.
- Dasher stuck: Too much mixture, or mix-ins added too soon.
If your ice cream never thickens, don’t throw it away—pour into a container and freeze. It will still taste good, just with more icy bits.
:max_bytes(150000):strip_icc()/KitchenAid_KitchenAttachments_IceCreamMaker_HeroSquare-69e0830dacf64623807477369c6540e6.jpg)
Credit: www.thespruceeats.com
Adding Flavors And Mix-ins
One of the best parts of homemade ice cream is creativity. Start simple, then try new things.
Basic Flavors
- Vanilla: Add vanilla extract or paste
- Chocolate: Mix in cocoa powder or melted chocolate
- Strawberry: Puree fresh berries and fold them in
Try blending flavor extracts, like almond or mint, for a twist. For chocolate ice cream, use Dutch-process cocoa for a deep, rich taste. For fruit flavors, cook and cool the fruit first to remove extra water—this prevents icy texture.
Adding During Churn
Add solid mix-ins (nuts, cookies, candies) in the last 2–3 minutes. Liquids (swirls of caramel or fudge) can be added by spooning into the finished ice cream and gently swirling.
Pro tip: Chop mix-ins small. Large chunks can jam the dasher or make scooping hard.
Example: For cookies and cream, crush cookies into small pieces and add them near the end. For a fudge swirl, heat chocolate sauce slightly and fold it in after churning.
Customizing Texture
- For chewier ice cream, use more cream.
- For lighter texture, increase milk.
- For dairy-free, use coconut or almond milk, but add extra sweetener for softness.
Try adding a pinch of salt to chocolate or caramel flavors—it balances sweetness and deepens taste.
Cleaning And Storing The Attachment
Proper care keeps your Kitchenaid Ice Cream Maker working for years.
Cleaning Steps
- Wait until the bowl is room temperature. Never run hot water on a frozen bowl—it can crack.
- Wash the bowl with mild soap and warm water. Don’t submerge or soak. Wipe the dasher and drive assembly.
- Dry all parts completely before storing.
If ice cream dries onto the bowl, let it soak briefly in warm water (not hot). For stubborn spots, use a soft sponge. Avoid abrasive pads.
Storage Tips
- Store the bowl in your freezer if you make ice cream often. That way, it’s always ready.
- Keep the dasher and drive assembly with your mixer.
If you have a small freezer, clear a space before freezing the bowl. Upright freezers work best, but chest freezers are fine if the bowl stays flat.
Avoiding Damage
- Never use metal utensils in the bowl.
- Don’t drop the bowl; the freezing liquid inside can be damaged.
- Don’t use dishwasher for the bowl.
Non-obvious insight: If you see black streaks in your ice cream, it’s from a scratched bowl. Replace it to avoid metal in your food. Also, if the bowl ever leaks after cleaning, the freezing liquid has escaped—stop using it.
Credit: www.lowes.com
Troubleshooting Common Problems
Even with careful use, you might hit a snag. Here’s how to fix them.
Ice Cream Too Soft Or Runny
Possible causes:
- Bowl not cold enough. Refreeze for 24 hours and try again.
- Mixture not chilled. Always refrigerate before churning.
- Overfilling the bowl. Use less mixture next time.
If your ice cream is always soft, try lowering your freezer’s temperature or using more fat (cream) in the recipe.
Ice Cream Too Hard
- Too little fat or sugar. Add more cream or sugar for softer texture.
- Freezer too cold. Let ice cream sit out 10 minutes before scooping.
If you like softer ice cream, try adding a tablespoon of corn syrup or a splash of alcohol to the base.
Dasher Stops Spinning
- Mixture is too thick. Stop the mixer and scoop out the ice cream.
- Too many mix-ins. Add them slowly at the end.
If the dasher jams, don’t force it—stop and clear the bowl.
Bowl Freezes To Mixer
- This is rare, but can happen. Let it thaw a few minutes, then gently lift off.
Wipe any moisture off the base before storing.
Comparing Kitchenaid Ice Cream Maker To Other Methods
Some people wonder if the Kitchenaid attachment is better than standalone machines or old-fashioned methods. Here’s a quick comparison:
| Method | Pros | Cons |
|---|---|---|
| Kitchenaid Attachment | Uses stand mixer, compact, easy to clean | Requires pre-freezing bowl, max 2 quarts |
| Compressor Machine | No pre-freeze, multiple batches | Expensive, large, heavy |
| Old-fashioned (ice & salt) | Classic texture, no electricity needed | Messy, noisy, time-consuming |
| Hand Stirring (freezer) | Cheapest, no equipment needed | Poor texture, labor-intensive |
If you make ice cream often or want to experiment with multiple flavors in one day, a compressor machine is better. But for most home cooks, the Kitchenaid attachment offers a perfect balance of convenience and results.
Making Dairy-free And Special Diet Ice Cream
Not everyone eats dairy or sugar. You can use the Kitchenaid Ice Cream Maker for many diets.
Dairy-free Options
- Use coconut milk, almond milk, or oat milk as a base.
- Add more fat (like coconut cream) for creaminess.
- Sweeten with honey, agave, or maple syrup.
Dairy-free bases freeze harder, so add a tablespoon of alcohol or corn syrup to keep the texture scoopable.
Sugar-free Or Low-sugar
- Use sugar substitutes (erythritol, stevia).
- Add a tablespoon of alcohol (vodka or rum) to keep texture soft.
Test sugar substitutes first—some taste better than others and affect freezing. Avoid artificial sweeteners that turn icy.
Egg-free And Vegan
- Skip eggs in custard-style recipes.
- Use plant-based milks and stabilizers (like xanthan gum) for better mouthfeel.
Example: Mix 2 cans coconut milk, 3/4 cup sugar, 2 teaspoons vanilla, and a pinch of salt. Chill, then churn as usual.
For a richer vegan base, blend soaked cashews with plant milk and sweetener before chilling.
Storing Homemade Ice Cream
Homemade ice cream can melt and refreeze easily, changing the texture. Here’s how to keep it delicious.
Best Containers
- Use airtight, shallow containers for faster freezing.
- Avoid glass, which can crack.
- Press plastic wrap or wax paper on the surface to prevent ice crystals.
Shallow containers let ice cream freeze evenly, making it easier to scoop later. If you use plastic, choose BPA-free for safety.
Storage Time
- Best eaten within 1–2 weeks.
- After that, ice crystals may form and flavor fades.
Label containers with date and flavor—especially helpful if you make several kinds.
Scooping Tips
- Let ice cream sit at room temperature for 5–10 minutes.
- Dip scoop in hot water for easy serving.
If you struggle to scoop, try a spade-style scoop instead of a round one. It cuts through hard ice cream more easily.
Creative Recipes And Variations
Once you master the basics, try new recipes. Here are a few ideas:
Classic Chocolate Chip
- Add 1 cup mini chocolate chips in the last 2 minutes.
Mini chips mix better than regular size—less chance of clogging the dasher.
Strawberry Swirl
- Puree 1 cup strawberries with 1/4 cup sugar. Swirl into finished ice cream.
Add the swirl gently for a marbled look.
Coffee Toffee Crunch
- Dissolve 2 tablespoons instant coffee in your base. Stir in crushed toffee bars.
For stronger flavor, use espresso powder.
Vegan Chocolate
- Use coconut milk, cocoa powder, and agave syrup.
A dash of vanilla and a pinch of salt bring out the chocolate.
Sorbet
- Mix pureed fruit, water, and sugar. Churn as usual for a dairy-free treat.
Lemon or mango sorbet is refreshing and easy to make.
Cleaning And Maintenance Data
Proper cleaning and care extend the life of your attachment. Here’s a quick reference:
| Part | How to Clean | Dishwasher Safe? | Tips |
|---|---|---|---|
| Freeze Bowl | Warm soapy water, hand wash only | No | Dry fully before freezing |
| Dasher | Warm soapy water | Yes (top rack) | Check for cracks |
| Drive Assembly | Wipe with damp cloth | No | Don’t submerge |
If you notice wear or damage, replace the part before next use.
Common Mistakes And How To Avoid Them
Even experienced cooks can make mistakes. Here are some frequent ones:
- Not freezing the bowl long enough: Always freeze for at least 15 hours.
- Pouring in mixture before starting the mixer: Causes mixture to freeze to the side instantly, making cleaning harder.
- Overfilling the bowl: More isn’t better. Stick to recommended volume.
- Using warm mixture: Slows freezing, causes icy texture.
- Adding mix-ins too early: Can jam the dasher. Add in the last few minutes.
- Using metal utensils: Scratches the bowl, leading to black streaks.
- Not cleaning immediately: Dried ice cream is tough to remove.
Pro tip: If your ice cream is icy, add a tablespoon of corn syrup or a splash of alcohol to the base next time.
Another mistake: ignoring the mixer’s speed settings. Always use “stir” or the lowest setting—higher speeds don’t improve texture and can damage the attachment.
Frequently Asked Questions
Why Is My Ice Cream Not Thickening In The Kitchenaid Ice Cream Maker?
Usually, the freeze bowl is not cold enough, or the mixture was not properly chilled. Always freeze the bowl for at least 15 hours at 0°F (-18°C) or colder. Refrigerate your ice cream base for several hours before churning. Also, never overfill the bowl.
Can I Make More Than One Batch In A Row?
No. The bowl must be completely refrozen before starting another batch. This usually takes at least 15 hours. If you want to make multiple batches quickly, buy an extra freeze bowl.
How Do I Know When The Ice Cream Is Ready?
When the ice cream reaches a soft serve consistency and the dasher slows or the ice cream rises up the sides, it’s done. This usually takes 20–30 minutes. For harder ice cream, freeze it in a container for a few hours.
What Recipes Work Best With The Kitchenaid Ice Cream Maker?
Simple custard or Philadelphia-style bases (milk, cream, sugar, flavoring) work best. You can also make gelato, frozen yogurt, or sorbet. Avoid recipes with large chunks or sticky candies, as they can jam the dasher.
Where Can I Find More Recipes And Tips?
The official Kitchenaid website has a large collection of recipes and advice for different types of ice cream, gelato, and frozen desserts.
Final Thoughts
The Kitchenaid Ice Cream Maker turns your stand mixer into a powerful frozen dessert machine. With a little planning—freezing the bowl, chilling your mixture, and working quickly—you’ll make ice cream that rivals any store. Pay attention to the details, learn from small mistakes, and experiment with flavors. Soon, you’ll discover the joy of homemade ice cream, tailored exactly to your taste. This is one kitchen tool you’ll use again and again, delighting family and friends with every scoop.
Once you become comfortable with the process, you’ll see how easy it is to adjust recipes to your preferences. Try unusual flavors, make healthier versions, or invent your own signature combinations. The Kitchenaid Ice Cream Maker is more than a tool—it’s an invitation to creativity and sharing.
Homemade ice cream isn’t just dessert; it’s a memory in the making.