If you love baking bread at home, you probably know the importance of proofing. Proper proofing is the secret behind soft, airy, and flavorful bread. But for many home bakers, finding the right warm and humid place for dough to rise is a challenge. That’s where the bread proof function on Samsung ovens comes in. This feature helps you create bakery-quality bread right in your kitchen, even if you are new to baking.
Using the bread proof function is not just about pressing a button. You need to understand what it does, how to set it up, and how to use it for different types of bread. This guide explains everything you need to know, from preparing your dough to troubleshooting problems.
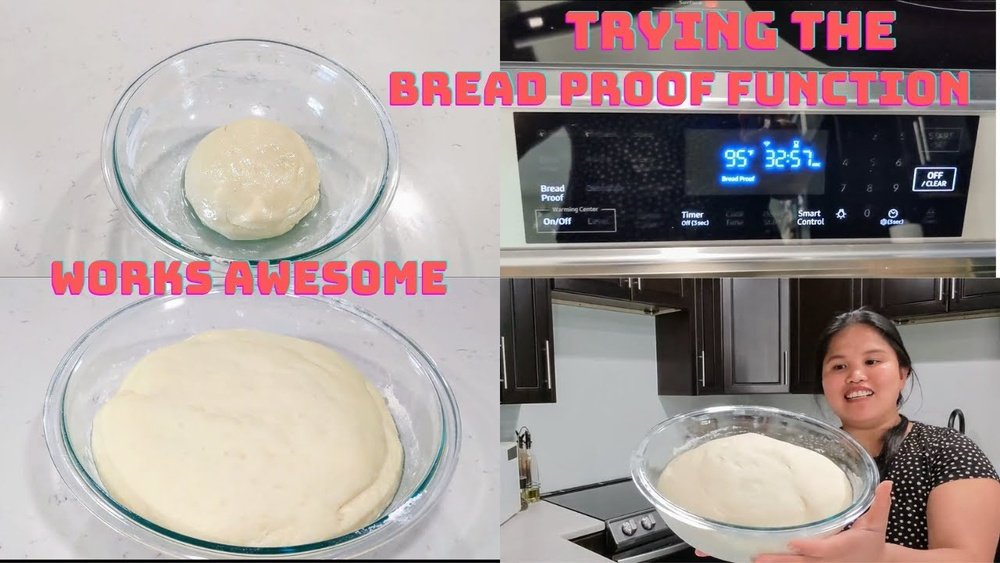
By the end, you’ll feel confident using your Samsung oven’s bread proof function for perfect results every time.
What Is The Bread Proof Function?
The bread proof function is a special setting on many Samsung ovens. It creates a warm, controlled environment, usually between 80°F and 100°F (27°C to 38°C). This temperature range is perfect for yeast activity. Yeast makes your dough rise by producing gas, which gives bread its light texture.
In the past, bakers used warm spots in their kitchen or improvised with ovens and towels. The bread proof function saves you time and guesswork. It helps you avoid dough that is too dense or doesn’t rise enough.
How It Works
Samsung ovens use gentle, even heat for proofing. This avoids hot spots that can kill yeast. Some models also add humidity, which keeps dough moist and prevents a dry crust from forming during proofing.
There’s no need to preheat the oven for proofing. The setting uses less power than baking, making it energy-efficient. Most Samsung ovens allow you to set proofing times from 1 to 12 hours, depending on your recipe.
Why It Matters
Perfect proofing gives your bread:
- Better volume and shape
- Soft, even texture
- Improved flavor
Underproofed bread is heavy and small, while overproofed bread can collapse. The bread proof function helps you avoid these problems, especially if your kitchen temperature changes with the seasons.
Preparing Your Dough For Proofing
Before you use the bread proof function, you need to prepare your dough. Every bread recipe has its own steps, but some basics apply to all.
Ingredients And Mixing
Start with fresh yeast or active dry yeast. Old yeast may not rise well. Use the exact amount of yeast, flour, water, and salt your recipe asks for. Mix until you have a smooth dough.
Kneading is important. Knead by hand for 8-10 minutes or use a stand mixer with a dough hook for 5-7 minutes. Proper kneading develops gluten, which helps the bread rise and keeps it from falling flat.
First Rise (bulk Fermentation)
Most recipes need a first rise before shaping. This is when the yeast starts working and the dough doubles in size. Some bakers let this happen at room temperature, but you can use the bread proof function for a faster, more even rise.
Tip: Lightly oil the bowl and cover the dough with plastic wrap or a damp towel. This keeps moisture in and prevents a dry crust.
Shaping And Second Rise
After the first rise, punch down the dough to release gas. Shape the dough into loaves, rolls, or other forms. Many breads need a second proof, sometimes called the final rise, after shaping. This helps the dough hold its shape and makes the bread fluffier.
How To Use The Bread Proof Function On Samsung Oven
Now you are ready to use your Samsung oven’s bread proof function. The process is simple, but following each step helps you get the best results.
Step 1: Prepare The Oven
- Remove any racks you don’t need, or adjust them for your dough pans.
- Make sure the oven is clean and dry. Leftover food or crumbs can affect the proofing process.
- If your oven has a steam-clean or self-clean function, consider running it before proofing for the best environment.
Step 2: Set Up The Dough
- Place your dough in a lightly greased bowl or on a baking tray, depending on the recipe.
- Cover the dough with a damp towel or plastic wrap. This keeps moisture in.
- If you are proofing several dough balls, space them so they don’t touch when they rise.
Step 3: Select The Bread Proof Function
- Press the Bread Proof or Proof button on your Samsung oven. On some models, this is under the Special Functions or Mode menu.
- Set the temperature. Most bread recipes proof well at 85°F (29°C). For richer doughs (with eggs, butter, or sugar), use 90°F to 100°F (32°C to 38°C).
- Set the timer according to your recipe. Most first rises take 60-90 minutes. Second rises are often 30-60 minutes.
Step 4: Place The Dough In The Oven
- Put the bowl or tray with dough on the center rack.
- Close the oven door gently. Avoid slamming or shaking, which can cause dough to deflate.
- Check the dough after 30-40 minutes. Well-proofed dough should double in size.
Step 5: Finish And Bake
- When the dough has risen enough, carefully remove it from the oven.
- Preheat the oven for baking. Do not leave dough in the oven during preheating, as high heat can ruin the proofed dough.
- Bake as your recipe says.
Important: Never use the bread proof function for other foods or leave dough in the oven overnight. Overproofed dough can lose its shape and flavor.
Bread Types And Proofing Adjustments
Different types of bread need different proofing times and temperatures. Here’s how to adjust the bread proof function for common breads.
| Bread Type | Proof Temperature | First Rise Time | Second Rise Time |
|---|---|---|---|
| White Sandwich Bread | 85°F (29°C) | 60 min | 30-40 min |
| Whole Wheat Bread | 85°F (29°C) | 75-90 min | 35-45 min |
| Brioche (Rich Dough) | 95°F (35°C) | 90-120 min | 45-60 min |
| Sourdough | 80°F (27°C) | 2-4 hr | 1-2 hr |
| Rolls and Buns | 90°F (32°C) | 50-60 min | 20-30 min |
Non-obvious insight: For sourdough, lower proofing temperatures give better flavor, because wild yeast and bacteria work more slowly.
Another tip: Rich doughs (like brioche and challah) need longer proofing at higher temperatures. This is because fat and sugar slow down yeast.

Credit: www.reddit.com
Common Mistakes And How To Avoid Them
Even with the bread proof function, mistakes can happen. Here’s how to avoid the most common problems.
1. Overproofing
If you leave dough too long, it rises too much, then collapses. Overproofed dough can be sticky, hard to shape, and taste sour.
How to avoid: Set a timer and check the dough often. If you poke the dough and it springs back slowly, it’s ready. If it collapses, it’s overproofed.
2. Underproofing
Dough that does not rise enough stays dense and heavy.
How to avoid: Make sure yeast is fresh. Use the proof function at the right temperature. Don’t rush the process. If the dough has not doubled, give it more time.
3. Dry Surface
If the surface of your dough dries out, it forms a crust. This can stop the dough from rising well.
How to avoid: Always cover dough with a damp towel or plastic wrap. In very dry climates, you can spray a little water inside the oven before closing the door.
4. Wrong Temperature
Too hot can kill yeast, too cold slows it down.
How to avoid: Check the oven’s proof temperature. Some Samsung ovens let you adjust this. For most breads, 85°F is best.
5. Using The Wrong Pan
Metal pans heat up faster and can dry out dough during proofing.
How to avoid: Use glass or ceramic bowls for proofing. Metal is better for baking.
Non-obvious insight: Never proof dough on a hot oven rack. Let the oven reach the proofing temperature first, then put the dough inside.
Comparison: Bread Proof Function Vs. Traditional Proofing
Is the bread proof function better than traditional proofing? Here’s a side-by-side look.
| Feature | Bread Proof Function | Traditional Proofing (Room Temp) |
|---|---|---|
| Temperature Control | Consistent, adjustable | Varies with room |
| Humidity | Can keep dough moist | Often dry, crust forms |
| Speed | Faster, reliable | Slower in cool rooms |
| Effort | Set and forget | Needs checking |
| Risk of Overproofing | Lower (with timer) | Higher (easy to forget) |
Key takeaway: The bread proof function saves time and gives consistent results, especially if your kitchen is cool or drafty.

Credit: www.reddit.com
Tips For Best Results
Getting perfect bread is more than following the steps. Here are some expert tips for using your Samsung oven’s bread proof function:
- Let dough come to room temperature before proofing, especially if you use cold water or ingredients.
- Do not open the oven door often during proofing. Each time you open, heat and humidity escape.
- Use an oven thermometer to double-check proofing temperature. Oven sensors can be off by a few degrees.
- For extra humidity, place a cup of hot water on the lower rack. This is helpful for crusty breads.
- Don’t proof overnight in the oven. Use the refrigerator for slow, overnight proofing instead.
- Clean the oven after proofing. Yeast can leave a smell if not cleaned out.
Hidden insight: For shaped breads (like baguettes), proof them on parchment paper. You can move the paper directly to the baking sheet, which avoids deflating the dough.
Advanced Uses: Cold Proofing And Multi-stage Proofs
Some recipes call for cold proofing (retarding the dough in the fridge) or multi-stage proofing. Here’s how to combine these methods with your Samsung oven:
- Cold proofing: Place dough in the fridge overnight. The next day, use the bread proof function for the final rise. This gives bread a chewy texture and deep flavor.
- Multi-stage proofing: For artisan breads, you may need several rises. Use the oven’s proof function for each stage, adjusting time and temperature as needed.
Note: Always let cold dough warm up for 15-20 minutes before proofing in the oven. This prevents uneven rising.
Cleaning And Maintenance After Proofing
Using the bread proof function is clean, but dough can sometimes spill or drip. Here’s how to keep your Samsung oven in top shape:
- Wipe up spills immediately with a damp cloth after the oven cools.
- Remove racks and wash them with warm soapy water if flour or dough sticks.
- Use the oven’s cleaning cycle every few weeks, especially if you bake often.
- Check the door seal for any dough or residue that could affect the oven’s seal.
Non-obvious tip: Avoid using harsh chemicals, which can damage the oven’s finish or leave smells that affect future baking.
Troubleshooting: When Proofing Doesn’t Go As Planned
Even with a good oven, things can go wrong. Here’s how to fix common issues:
- Dough not rising: Check yeast freshness, water temperature, and proof setting.
- Crust forms too soon: Increase humidity by covering dough better or adding water to the oven.
- Uneven rising: Rotate the pan halfway through proofing. Some ovens have hot spots.
- Oven error codes: If your Samsung oven shows an error, turn it off, unplug it, and check the manual. Contact Samsung support if needed.
Advanced fix: If you live in a high-altitude area, reduce yeast and proofing time. High altitudes speed up yeast activity.

Credit: www.youtube.com
Safety And Best Practices
Samsung ovens are safe, but always follow these best practices:
- Never proof in a hot oven (over 110°F/43°C), as this kills yeast.
- Do not leave dough in the oven unattended for long periods.
- Keep children away while the oven is running, even in proof mode.
- Do not use proof function for eggs, dairy, or other non-bread foods. It is not a substitute for cooking or reheating.
Comparing Samsung Oven Models: Proof Function Features
Not all Samsung ovens have the same proof function features. Here’s a quick look at what you may find:
| Model | Proof Temp Range | Humidity Control | Max Proof Time | Display Type |
|---|---|---|---|---|
| Samsung Flex Duo | 80-100°F | Yes | 12 hr | Touchscreen |
| Samsung Slide-In Gas | 85°F fixed | No | 6 hr | Knob + Digital |
| Samsung Smart Oven | 80-100°F | Yes, App Control | 12 hr | WiFi/App |
| Samsung Standard Range | 85°F fixed | No | 6 hr | Basic Digital |
If you want more control, look for models with adjustable temperature and humidity features.
Real-life Example: Baking Soft Dinner Rolls
Let’s walk through using the bread proof function with a real recipe.
Ingredients:
- 3 ½ cups all-purpose flour
- 2 ¼ tsp active dry yeast (1 packet)
- ¼ cup sugar
- 1 tsp salt
- 1 cup warm milk (100°F/38°C)
- ¼ cup unsalted butter, melted
- 1 egg
Steps:
- Mix yeast, warm milk, and sugar. Let sit until foamy (about 5 minutes).
- Add butter, egg, and salt. Mix in flour, one cup at a time, until dough forms.
- Knead until smooth, about 8 minutes.
- Place dough in a greased bowl, cover with plastic wrap.
- Set Samsung oven to bread proof function at 85°F for 1 hour.
- Dough should double in size. Punch down, divide into 12 balls.
- Place balls on greased baking sheet, cover, and proof again for 30 minutes.
- Preheat oven to 350°F. Bake rolls for 20 minutes or until golden.
Tip: If dough rises too quickly, check oven temperature accuracy.
Benefits Of Using Bread Proof Function
- Consistent results every time you bake
- Saves time compared to traditional proofing
- No guesswork about temperature or humidity
- More flavor and better texture in homemade bread
- Useful for all yeast breads, from sandwich loaves to cinnamon rolls
Using your Samsung oven’s bread proof function is one of the easiest ways to improve your home baking skills. Even professional bakers use proofing boxes or controlled ovens for the best bread.
Where To Learn More
For more bread baking tips and Samsung oven guides, check your oven’s manual or visit the official Samsung website. If you want to dive deeper into bread science, check out resources like King Arthur Baking Company.
Frequently Asked Questions
How Do I Know If My Samsung Oven Has A Bread Proof Function?
Most Samsung ovens made after 2015 have this feature. Look for a Proof or Bread Proof button on the control panel. If you are not sure, check your user manual or the Samsung website.
Can I Use The Bread Proof Function For Pizza Dough?
Yes. The proof function works for any yeast dough, including pizza dough, cinnamon rolls, and focaccia. Adjust time based on your recipe and check when the dough doubles in size.
What If My Oven Does Not Have A Bread Proof Function?
You can still proof dough in a Samsung oven by setting it to the lowest possible temperature (usually “Warm”), then turning it off and placing the dough inside with the door closed. Just make sure the oven is not too hot.
Is The Bread Proof Function Energy Efficient?
Yes. The bread proof function uses less energy than baking or roasting. It keeps the temperature low, which is enough for proofing but saves power compared to running your oven at high heat.
Can I Proof Multiple Trays At Once?
You can, but space the trays so air can flow around them. If the oven is too crowded, proofing can be uneven. For best results, rotate trays halfway through proofing.
Bread baking is part science, part art. With the Samsung oven’s bread proof function, you have the science covered. Now it’s time to enjoy the art of making perfect homemade bread, every time.