If you love cooking at home, you already know how important a sharp kitchen knife is. Slicing tomatoes, dicing onions, or cutting meat—every task is easier and safer with a sharp blade. But knives do not stay sharp forever. After a few weeks of use, even the best knives get dull. That’s where sharpening rods come in. Many home cooks own a rod (also called a honing steel or sharpening steel), but few know how to use it well. With the right technique, you can keep your knives sharp every day—without expensive tools or professional help.
This guide will show you exactly how to sharpen a kitchen knife with a rod. You will learn why using a rod matters, what types of rods exist, and which one is best for your knives. You will get step-by-step instructions, practical tips, and answers to common questions.
Whether you are a total beginner or want to improve your skills, this article will help you build confidence and get great results.
Why Knife Sharpness Matters In The Kitchen
A dull knife is not just a small problem. It slows down your cooking, makes food preparation harder, and can even be dangerous. When a knife is blunt, you need to push harder, and the blade can slip and cut your fingers. Chefs and food safety experts say that sharp knives are actually safer than dull ones.
A sharp knife gives you:
- Cleaner cuts: Slices through food without crushing.
- Faster prep: Less effort, more control.
- Less risk of injury: Blade goes where you want it.
Professional kitchens sharpen knives daily. At home, regular maintenance can make every meal easier and safer.
What Is A Sharpening Rod?
A sharpening rod (often called a honing steel or sharpening steel) is a long, thin tool made of steel, ceramic, or diamond-coated material. It looks like a metal stick with a handle and is used to realign the edge of a kitchen knife.
Many people think a rod “sharpens” knives by grinding away metal. That’s not exactly true. Most rods, especially the common steel ones, realign the blade’s microscopic edge instead of removing much metal. Over time, cutting and chopping cause the edge to bend slightly. This makes the knife feel dull. A rod helps straighten the edge, so the knife cuts well again.
Some rods, especially diamond or ceramic ones, can also remove a small amount of metal to refresh the edge further. The type of rod you use can affect how sharp your knife gets and how long it stays that way.

Credit: www.youtube.com
Types Of Sharpening Rods
Understanding the different rods will help you choose the right one for your kitchen. Here are the main types:
| Type | Material | Best For | How It Works |
|---|---|---|---|
| Standard Steel Rod | Hardened steel | Most home cooks | Realigns blade, little metal removal |
| Ceramic Rod | Ceramic | Harder knives, light sharpening | Slightly abrasive, can remove metal |
| Diamond Rod | Steel core, diamond coating | Very dull knives, quick sharpening | Abrasive, removes more metal |
Standard steel rods are found in most knife sets. They are good for regular maintenance but will not restore a very dull or damaged blade. Ceramic rods are a bit harder and can lightly sharpen as they realign the edge. Diamond rods are the most abrasive and can quickly refresh a dull blade—but if used too often, they can wear out your knife.
A common mistake is using a steel rod to fix a knife that is already very dull. In that case, you need a proper sharpening stone or diamond rod before using a steel rod for daily maintenance.
Choosing The Right Sharpening Rod
Many people use whatever rod came with their knife set. But the best rod for you depends on your knives and how you cook. Here’s what to consider:
1. Knife Type
Softer steel knives (most Western brands) do well with standard steel rods. Harder Japanese knives often prefer ceramic or fine diamond rods.
2. Rod Length
Your rod should be at least as long as your longest knife blade. Most home rods are 8–12 inches.
- Rod Material
- For quick daily maintenance: Steel rod.
- For harder steels or extra sharpness: Ceramic rod.
- For very dull blades or quick touch-ups: Diamond rod.
- Handle and Grip
Safety is important. Choose a rod with a comfortable, non-slip handle and a finger guard.
5. Budget
Steel rods are cheapest, ceramic and diamond cost more but last longer.
One non-obvious tip: If you have very expensive knives, check the manufacturer’s advice. Some warn against using diamond rods, which can be too aggressive for thin blades.

Credit: www.amazon.com
How A Sharpening Rod Works
Think of the knife edge as a super-thin line of metal. When you cut, this edge bends and folds microscopically. The rod’s surface, when used at the right angle, pushes the bent edge back into alignment, making the knife feel sharp again.
If you look at a used knife under a microscope, you’ll see tiny dents and rolls along the edge. The rod does not remove much material (unless it’s diamond or rough ceramic), but it straightens these bends. This process is sometimes called “honing,” while “sharpening” means actually grinding away metal to make a new edge.
But in everyday language, people say “sharpening rod” for both.
Preparing To Sharpen: Safety And Setup
Before you start, get your area ready. Sharpening knives can be safe if you follow some simple rules.
- Find a stable surface: A table or countertop with good light.
- Hold the rod firmly: Most rods have a finger guard; use it.
- Clean your knife: Remove food and oil, so nothing gets in the way.
- Keep hands dry: Wet hands can slip.
- No distractions: Focus on the task.
If you are new, work slowly. There is no need to hurry. A few careful strokes are better than many fast, careless ones.
Step-by-step: How To Sharpen A Kitchen Knife With A Rod
Now, let’s break down the process into clear steps. These instructions work for most kitchen knives and all three rod types.
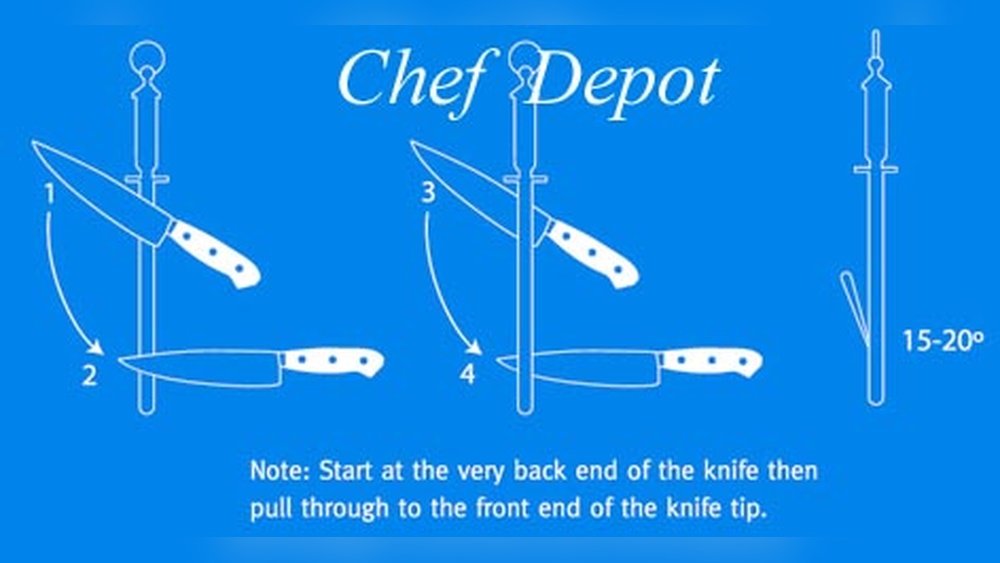
1. Hold The Rod Vertically
Grip the handle with your non-dominant hand (left hand if you are right-handed, and vice versa). Place the tip of the rod on a cutting board or non-slip surface. Hold it straight up and down. The rod should not move.
2. Hold The Knife At The Correct Angle
This is the most important step. Most kitchen knives need a 15–20 degree angle between the blade and the rod.
How to judge the angle:
- 20 degrees: Imagine a slice of pizza (about that steep).
- For Japanese knives: Use 15 degrees, slightly shallower.
- Some rods have angle guides, but you can learn with practice.
Hold the knife by the handle in your dominant hand. Place the heel (the part near the handle) against the top of the rod.
3. Draw The Blade Down And Across
With gentle pressure, draw the knife down the rod while moving it from the heel to the tip. The motion should be smooth, as if you are slicing a thin layer off the rod.
- Keep the angle steady.
- Use the full length of both the knife and rod.
- Do not push hard; let the rod do the work.
4. Alternate Sides
After one stroke, switch to the other side of the blade. Place the other side of the knife against the rod, repeat the same motion: down and across, heel to tip.
- Each side should get the same number of strokes.
- Most home cooks do 5–10 strokes per side.
5. Finish And Test
After you finish, wipe the blade with a damp towel to remove any metal dust. Test the sharpness by slicing a piece of paper or a tomato. The knife should cut easily, with little pressure.
If not, repeat the process with a few more gentle strokes per side.
Common Mistakes When Using A Sharpening Rod
Many people use a sharpening rod but do not get good results. Here are some typical errors to avoid:
1. Wrong Angle
Too steep or too shallow will not realign the edge well. Practice holding 15–20 degrees.
2. Using Too Much Force
Pressing hard can damage the blade and rod. Gentle, controlled strokes are best.
3. Not Alternating Sides
Doing all strokes on one side can create a lopsided edge. Always alternate.
4. Not Using The Whole Blade
Some people only sharpen the middle, missing the tip and heel. Use the entire length.
5. Trying To Sharpen A Severely Dull Knife
A rod can’t fix a blade that is very blunt or chipped. You need a whetstone or professional sharpening first.
6. Not Cleaning The Rod
Metal dust builds up on the rod. Wipe it after each use for best results.
One advanced tip: If your knife is high-carbon or very thin, use a ceramic rod and fewer, lighter strokes. Harder steels can chip if handled roughly.
Comparing Sharpening Rods To Other Methods
Is a rod the best tool for sharpening knives? Let’s compare it with other common methods.
| Method | Sharpness Achieved | Best For | Skill Needed |
|---|---|---|---|
| Sharpening Rod | Good (realigns edge) | Regular maintenance | Easy to learn |
| Whetstone | Excellent (reshapes edge) | Very dull or damaged knives | Medium to advanced |
| Electric Sharpener | Good to excellent | Quick sharpening | Beginner |
| Pull-through Sharpener | Fair to good | Quick touch-ups | Beginner |
Sharpening rods are best for daily or weekly touch-ups. They are not a replacement for a whetstone or professional sharpening, which you need a few times a year. But a rod, used well, keeps your knives sharp longer and reduces the need for other tools.
How Often Should You Sharpen With A Rod?
The answer depends on how often you cook, what you cut, and your knife quality.
- Every day: If you cook daily, use the rod before or after each use.
- Weekly: For light home use, once a week is enough.
- After heavy jobs: After cutting bones or hard materials, hone your knife.
A useful tip: Even if your knife feels sharp, a few quick strokes on the rod can prevent dullness. It is easier to maintain an edge than to restore a blunt one.
Signs Your Knife Needs Sharpening
Sometimes, it’s hard to tell if your knife is dull or just dirty. Look for these signs:
- Difficulty slicing tomatoes or onions
- Blade slips off food instead of biting in
- Crushing herbs instead of cleanly cutting
- Uneven or torn cuts
If you notice any of these, it’s time for the rod.
Caring For Your Sharpening Rod
A good rod can last many years if you treat it well. Here’s how:
- Wipe after use: Use a damp cloth to remove metal dust.
- Wash occasionally: For steel or ceramic rods, wash with warm, soapy water. Dry fully.
- Store safely: Keep in a knife block or hang on a hook.
- Avoid dropping: Ceramic rods can shatter if dropped.
- Check for wear: Diamond rods lose grit over time. Replace if you notice reduced effectiveness.
One detail most people miss: Never put your rod in the dishwasher. The handle can loosen, and the rod can rust or chip.
Advanced Tips For Knife Sharpening With A Rod
Ready to go beyond basics? Here are expert-level suggestions:
1. Use A Light Touch
Less pressure is better. The rod works by straightening, not grinding.
2. Try Different Angles
For cleavers or thick knives, use a slightly steeper angle (20–22 degrees). For fillet knives, try a shallower angle (12–15 degrees).
3. Check The Edge With Your Fingernail
Gently run your fingernail across the edge (perpendicular, not along the blade). If it catches, the edge is aligned. If it slides, keep honing.
4. Finish With A Strop
For extra sharpness, use a leather strop after the rod. It polishes the edge.
5. Use A Magnifying Glass
Look at the blade under light. You’ll see if the edge is straight or still rolled.
Small details like these can make a big difference in sharpness and knife life.
When To Use A Whetstone Instead Of A Rod
Sometimes, a rod is not enough. If your knife:
- Can’t cut paper easily
- Feels rough or has chips
- Is very dull after using the rod
…it’s time for a whetstone or a professional sharpening service. A rod maintains the edge but cannot create a new one. Most home cooks need a full resharpening every 3–6 months, depending on use.
Practical Examples: Sharpening Different Kitchen Knives
Let’s look at how to sharpen common kitchen knives with a rod:
Chef’s Knife
The most used tool in the kitchen. Hold at 20 degrees, 7–10 strokes per side. Use the whole blade.
Paring Knife
Smaller, so go slower. 15–18 degree angle, 5–7 strokes per side.
Bread Knife
Serrated knives are tricky. Most rods do not work; use a special serrated rod or get professional help.
Japanese Knife (e.g., Santoku)
Usually harder steel, so use a ceramic rod if possible. 12–15 degree angle, very light pressure, 6–8 strokes per side.
Cleaver
Heavier, so a 22-degree angle is safer. Fewer strokes (3–5 per side), but keep control.
One insight: Do not use a rod on ceramic knives. They need a diamond tool or must be sent away for sharpening.
Safety Tips For Using A Sharpening Rod
Knife sharpening is safe if you follow basic rules:
- Keep fingers behind the guard
- Use a non-slip surface
- Work slowly, especially if new
- Never try to catch a dropped knife or rod
- Keep children and pets away
If you are unsure, start with a dull butter knife for practice.
How To Tell If Your Knife Is Sharp Enough
Testing sharpness is easy and safe:
1. Paper Test
Hold a piece of paper by one end, slice with the knife. A sharp knife will cut smoothly.
2. Tomato Test
Try slicing a tomato without pressure. A sharp knife will glide through the skin.
3. Onion Test
If your knife slides off the onion, it is dull.
4. Visual Inspection
Look at the edge in good light. If you see shiny spots, that is a rolled edge.
If your knife passes these, you are ready to cook.
Sharpening Rods: Myths And Facts
Many myths surround knife sharpening. Here are some facts:
- Myth: Sharpening rods make knives razor-sharp
Fact: Rods maintain, not fully sharpen. You need a stone for razor edges.
- Myth: More pressure means sharper knives
Fact: Light pressure is best.
- Myth: You need special skills
Fact: Anyone can learn with practice.
- Myth: The rod fixes chipped knives
Fact: Only stones or professionals can repair chips.
Learning the truth can save you time, effort, and money.

Credit: www.walmart.com
How Professional Chefs Use Sharpening Rods
In restaurants, chefs use a rod many times a day. They do quick, light strokes before service and during prep. They store rods nearby and always keep blades clean. This habit keeps knives sharp and reduces accidents.
One chef’s trick: They check the blade with their thumb pad (never run your finger along the edge). If it feels smooth, the knife is ready.
If you want to improve your home cooking, copy the pros—regular, careful honing is the secret.
The Science Behind Knife Edges
A knife’s sharpness comes from its edge geometry. Good knives have a narrow, even angle along the blade. Each time you use a rod, you restore this shape. Over time, even with regular honing, the edge wears away and must be reground with a stone.
Studies show that home cooks who use a rod weekly extend the life of their knives by up to 50%. Regular maintenance means fewer trips to the sharpener and better food prep every day. For a deeper look at knife science, see this Wikipedia article.
Frequently Asked Questions
What Is The Difference Between Honing And Sharpening?
Honing realigns the existing edge; it does not remove much metal. Sharpening means grinding away metal to create a new edge. A rod hones; a stone sharpens.
How Often Should I Use A Sharpening Rod?
Use the rod every few days if you cook often, or at least once a week for regular home cooking. Light, frequent honing keeps knives sharp longer.
Can I Use A Sharpening Rod On All Types Of Knives?
Most kitchen knives (chef, paring, utility, cleaver) can be honed with a rod. Avoid using rods on serrated or ceramic knives; they need special tools.
Why Isn’t My Knife Getting Sharp With The Rod?
If your knife is very dull, the rod can’t restore the edge. Use a whetstone or get professional sharpening first. Also, check your technique—correct angle and gentle strokes matter.
Are Diamond Rods Better Than Steel Or Ceramic?
Diamond rods are faster but more aggressive. They are good for very dull knives but can wear out softer blades. Steel rods are best for daily use; ceramic rods are a good balance for harder knives.
Keeping your kitchen knives sharp with a rod is a skill worth learning. It will make every meal easier, safer, and more enjoyable. With practice, you can maintain your knives in top condition, save money, and cook like a pro at home.