
Keeping a kitchen clean does more than make it look good—it also keeps your cooking safe and your appliances working well. One part that often gets overlooked is the gas stove burner caps. These small, round metal pieces sit on top of the burners. Over time, they collect grease, food spills, and even rust. If not cleaned regularly, dirty burner caps can lead to uneven flames, strange smells, or even damage your stove.
Many people think cleaning burner caps is hard or messy. But with the right steps, it’s a simple task you can do at home. Clean burner caps not only help your stove work better, but they also keep your cooking area safe from unwanted fires and odors.
This article will guide you through every detail of cleaning gas stove burner caps, from removing them safely to choosing the best cleaning solutions, and even tips for stubborn stains. You’ll also learn how to put them back correctly and keep them in top shape.
Let’s make your kitchen safer and your stove last longer.
Why Clean Gas Stove Burner Caps?
Burner caps are more than just metal covers. They help spread the flame evenly, making sure your food cooks right. When these caps get dirty, the flame can become weak, uneven, or even orange. This means your food won’t cook as it should, and you might use more gas than needed.
Grease and food bits left on burner caps can also cause smoke, bad smells, or even attract bugs. In some cases, old grease can catch fire, making it a safety risk. Also, if the burner caps are blocked, you may hear a clicking noise, but no flame comes out.
Regular cleaning avoids all these problems and keeps your stove running safely.
Understanding Your Gas Stove Burner Caps
Before you start cleaning, it’s helpful to know what burner caps are made of and how they fit in your stove.
Most burner caps are made from cast iron or heavy-duty steel. Some have a black enamel coating, while others are plain metal. They sit on top of the burner head, which is the part that lets out the gas. The cap’s job is to spread the heat evenly.
Different stoves have different styles of caps. Some are round and flat, while others have small holes or grooves. High-end stoves may have special caps designed to focus flames for certain types of cooking. Always check your stove’s manual if you’re unsure about your burner cap type.
What You Need To Clean Gas Stove Burner Caps
Gathering the right tools and cleaners makes the job easier and safer. Here’s what you’ll need:
- Soft sponge or cloth – For scrubbing without scratching the metal.
- Dish soap – Cuts grease and loosens food.
- Baking soda – A gentle but strong cleaner for tough stains.
- White vinegar – Helps dissolve mineral deposits and burnt-on grime.
- Old toothbrush or small brush – Reaches tight spots and grooves.
- Plastic or wooden scraper – For stubborn, stuck-on food.
- Rubber gloves – Protects your hands from grease and hot water.
- Bucket or sink – For soaking the caps.
- Paper towels or a drying cloth – For drying the caps before reassembly.
- Toothpick or needle – For cleaning out tiny holes if needed.
Some people use commercial stove cleaners, but these are often not needed unless the caps are extremely dirty. Always avoid steel wool or metal scrubbers—they can scratch and remove protective coatings.
Preparation: Safety First
Gas stoves mix fire and gas, so safety is very important. Before you touch the burner caps:
- Turn off all burners and make sure the stove is cool. Never try to clean parts that are hot.
- If your stove has a gas shut-off valve, turn it off for extra safety.
- Remove any pots, pans, or racks from the stove top.
- Wear rubber gloves if you have sensitive skin or are using strong cleaners.
These simple steps can prevent burns and make cleaning less stressful.
Removing Burner Caps Properly
Taking off the burner caps is usually easy, but some models have small differences.
- Wait for the burners to cool completely.
- Lift the cap gently. Most caps just rest on the burner head. Wiggle it slightly if it feels stuck.
- If the cap is stuck, do not force it. Try moving it side to side gently or use a little warm, soapy water around the edge to loosen grease.
- Check for pins or clips. Some stoves (especially older or specialty models) have small pins or clips holding the cap. If so, release them gently.
- Set the caps aside on a paper towel or cloth.
If you’re not sure, look at your stove’s manual or search for your stove model online. For most modern stoves, the caps lift off easily.
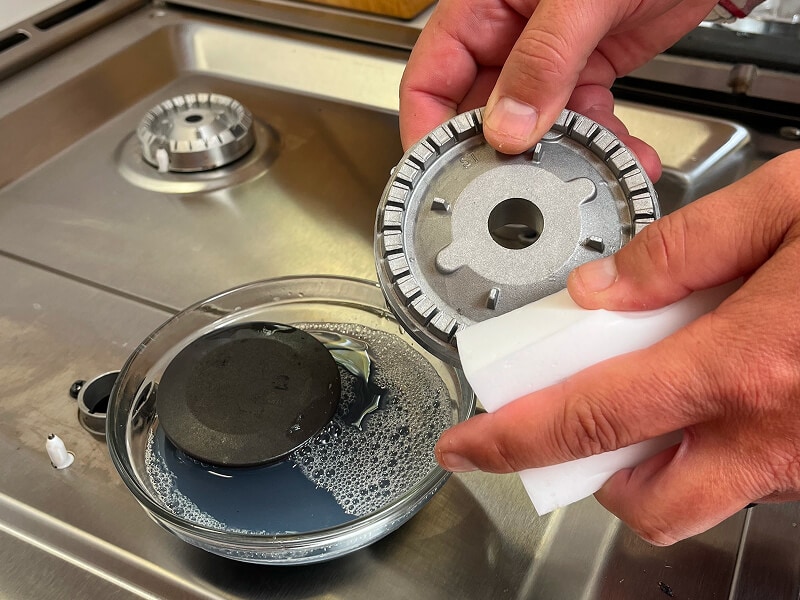
Basic Cleaning: Everyday Grease And Dirt
For regular dirt and light grease, you don’t need strong chemicals. Here’s a simple way to clean burner caps:
- Fill a sink or bucket with hot water.
- Add a few drops of dish soap. Mix until you see some bubbles.
- Place the burner caps in the water. Let them soak for 15–20 minutes. This softens any grease and food bits.
- Scrub with a sponge or brush. Focus on the top and sides. For grooves or holes, use an old toothbrush.
- Rinse with clean water.
- Dry the caps completely with a towel or let them air dry.
Everyday cleaning like this keeps caps working well and looking new. If your caps are only lightly dirty, this is usually enough.

Credit: www.reddit.com
Dealing With Stubborn Grease And Burnt-on Stains
Sometimes, regular washing isn’t enough. Grease can bake onto the metal, or food can burn and stick. Here’s how to handle tough grime:
Baking Soda Paste Method
Baking soda is safe and strong for removing burnt-on food.
- Make a thick paste by mixing 3 tablespoons of baking soda with 1 tablespoon of water.
- Spread the paste on the dirty parts of the burner cap.
- Let it sit for 20–30 minutes. This gives the baking soda time to break down stains.
- Scrub with a brush or sponge. Most grime will come off easily.
- Rinse and dry.
Vinegar Soak
Vinegar dissolves mineral buildup and cooked-on grease.
- Fill a bowl with equal parts white vinegar and water.
- Soak burner caps for 30–40 minutes.
- Scrub with a brush.
- Rinse with clean water and dry.
If stains remain, repeat the process or combine the baking soda paste and vinegar soak.
For Very Stubborn Stains
If the above methods don’t work, try:
- Sprinkling baking soda directly onto the cap, then spraying with vinegar. It will fizz and help lift tough dirt.
- Using a plastic scraper to gently lift stuck bits. Never use sharp metal objects.
Avoid using oven cleaner or harsh chemicals unless your stove’s manual says it’s safe. These products can damage the cap’s surface or leave unsafe residues.
How To Remove Rust From Burner Caps
Burner caps can rust, especially if they are made from cast iron or if water stays on them too long. Here’s what to do:
- Mix baking soda and water to make a thick paste.
- Spread the paste on rusty areas.
- Let it sit for 1 hour.
- Scrub with a soft brush or cloth. For heavy rust, use a little white vinegar.
- Rinse and dry completely.
After cleaning, apply a thin layer of cooking oil to the cap. This helps prevent rust from coming back. Never leave burner caps wet after cleaning—always dry them fully.
Cleaning Burner Cap Holes And Grooves
Some burner caps have small holes or grooves to spread the gas. If these get blocked, the flame can be weak or uneven.
- Use a toothpick or a sewing needle to gently clear any holes. Do not use anything sharp that could scratch the metal.
- Brush grooves with an old toothbrush.
- After cleaning, hold the cap up to the light. You should see through the holes.
Cleaning these small parts is easy to forget, but it makes a big difference in how your stove works.
Cleaning Enamel-coated Burner Caps
Many modern stoves have enamel-coated burner caps. These look shiny and are easier to clean, but they need gentle care.
- Avoid metal scrubbers or harsh cleaners—they can scratch the enamel.
- Use only soft sponges, baking soda, and dish soap.
- For stubborn stains, a little vinegar is safe, but rinse well.
If the enamel chips or cracks, replace the cap. Damaged enamel can allow rust and makes cleaning harder.

Credit: www.maytag.com
How Often Should You Clean Burner Caps?
Cleaning frequency depends on how much you cook and what you cook. Here’s a simple guide:
- Light cooking (once a day or less): Clean burner caps once a week.
- Heavy cooking (daily/frequent frying): Clean caps every 2–3 days.
- After big spills: Clean as soon as the stove cools.
Regular cleaning takes less time and makes deep cleaning easier. If you see a yellow or uneven flame, check the caps—they may need cleaning.
Cleaning Vs. Replacing Burner Caps
Sometimes, cleaning is not enough. Burner caps that are warped, cracked, or have lost their coating should be replaced.
Signs you need new caps:
- The cap is cracked or broken.
- The enamel is peeling off.
- The cap is badly rusted and does not clean up.
- The flame is still uneven after cleaning.
Replacement caps are available online and at appliance stores. Always buy the correct size and shape for your stove.
Credit: www.kitchenaid.com
Reassembling And Testing Burner Caps
After cleaning, it’s time to put everything back:
- Make sure the caps are 100% dry. Water can cause rust or make lighting difficult.
- Place each cap back on its burner head, making sure it sits flat and centered.
- Check for wobbles. The cap should not rock or move easily.
- Turn on each burner for a few seconds. The flame should be blue and even.
- If the burner won’t light, check that the cap is positioned correctly and that holes are not blocked.
Testing your stove after cleaning is important. It shows that everything is in place and working as it should.
How Clean Burner Caps Affect Cooking
You might wonder if clean burner caps really matter for your cooking. Here’s how they make a difference:
- Even heat: Clean caps spread the flame evenly, so food cooks better and faster.
- No strange smells: Old grease or burnt food can cause bad odors or smoke.
- Better gas use: Blocked caps waste gas and money.
- Safer kitchen: Clean caps reduce the risk of grease fires.
Many chefs say that a clean stove cooks more reliably. If you notice your food taking longer or burning in spots, the burner caps may need attention.
Comparing Cleaning Methods
Here’s a quick look at the most common cleaning options and when to use them:
| Cleaning Method | Best For | Time Needed | Notes |
|---|---|---|---|
| Dish Soap & Hot Water | Everyday grease and light dirt | 20–30 minutes | Gentle, safe for all caps |
| Baking Soda Paste | Burnt-on stains | 30–40 minutes | Good for tough spots |
| Vinegar Soak | Mineral deposits and heavy grease | 40–60 minutes | Can help with rust |
| Plastic Scraper | Stuck-on food bits | 5–10 minutes | Do not use metal tools |
Choose the method based on the type and amount of dirt on your burner caps.
Homemade Vs. Commercial Cleaners
You may wonder if commercial cleaners are better than home remedies. Here’s how they compare:
| Product Type | Effectiveness | Safety | Cost | Environmental Impact |
|---|---|---|---|---|
| Homemade (baking soda, vinegar) | High for most stains | Very safe | Low | Eco-friendly |
| Commercial Stove Cleaners | Very high, even for tough grime | Check labels; some are harsh | Medium to high | May contain chemicals |
| Oven Cleaner | Strongest, but risky for caps | Can damage surface | Medium | Not eco-friendly |
For most people, homemade cleaners are enough. Only choose strong commercial cleaners for extreme cases, and follow all safety instructions.
Common Mistakes When Cleaning Burner Caps
Even with simple steps, some mistakes can damage your burner caps or stove.
- Using metal scrubbers. These scratch and remove protective coatings.
- Not drying caps fully. Wet caps can rust or cause ignition problems.
- Forcing stuck caps. This can bend or break them. Always loosen gently.
- Using harsh chemicals. Strong cleaners can damage enamel or leave unsafe residues.
- Mixing up cap positions. Some stoves have different-sized caps for different burners. Make sure each cap goes back in the right place.
- Ignoring small holes. Blocked holes lead to weak or uneven flames.
Paying attention to these details saves you money and keeps your stove working well for years.
Tips For Keeping Burner Caps Clean Longer
Regular cleaning is best, but a few habits can help your burner caps stay cleaner:
- Wipe up spills as soon as the stove cools.
- Use splatter guards when frying or boiling.
- Clean caps during your weekly kitchen clean-up.
- Do not let water or food dry onto the caps.
- Keep a small brush handy for quick touch-ups.
These small actions mean less work and better results each time you cook.
What To Do If A Burner Cap Is Damaged
If you find a cap is bent, cracked, or badly rusted, it’s safer to replace it. Damaged caps can cause gas leaks or uneven flames. Look for replacement caps from your stove’s brand or a trusted seller. Make sure the size and shape match your burner exactly.
Never try to repair a broken cap with glue or tape. These can catch fire or release dangerous fumes when heated.
Professional Cleaning: When To Call For Help
Most people can clean burner caps themselves. But in some cases, professional help is best:
- The burner cap is stuck and will not come off.
- The flame stays weak or yellow after cleaning.
- The cap is badly rusted or warped.
- You’re unsure how to remove or reassemble parts.
A professional can clean or replace parts safely and check for deeper problems. This is especially important if you smell gas or see signs of leaks.
Environmental Impact Of Cleaning Methods
When cleaning your kitchen, it’s good to think about the environment. Homemade cleaners like baking soda and vinegar are safe for the earth and your family. They wash down the drain safely and don’t pollute water or air.
Commercial cleaners often contain harsh chemicals. Use them only when needed, and always follow disposal instructions. Also, avoid single-use wipes or heavy paper towel use—cloths can be washed and reused.
Making smart choices helps your home and the environment.
Real-world Example: Restoring An Old Burner Cap
Let’s look at a real case. Maria, a home cook, noticed her left burner was burning orange and food was taking longer to cook. She checked the burner cap—thick, black grease and some rust were stuck to it.
Maria soaked the cap in hot, soapy water for 30 minutes, scrubbed with baking soda paste, and used a toothbrush for the holes. After drying and oiling the cap, she placed it back. The flame turned blue and even, and her stove worked like new.
This shows that even old or badly stained caps can often be restored with patience and the right steps.
How Clean Burner Caps Improve Stove Life
Many people replace their stoves earlier than needed because of poor performance. Often, dirty or damaged burner caps are the hidden reason. By cleaning your burner caps regularly, you:
- Prevent rust and corrosion.
- Avoid gas leaks or uneven flames.
- Reduce the risk of small fires.
- Make your stove last longer.
A well-cared-for stove can work well for over 10 years. Regular cleaning is a small task that saves you money and keeps your kitchen safe.
Comparing Burner Cap Materials
The material of your burner cap affects how you clean and care for it. Here’s a simple comparison:
| Material | Durability | Cleaning Needs | Risk of Rust |
|---|---|---|---|
| Cast Iron | Very strong | Needs oiling after cleaning | High if wet |
| Enamel-Coated Steel | Strong, less rust | Gentle cleaning only | Low if coating is intact |
| Aluminum | Lightweight, less strong | Easy to clean, scratches easily | Medium |
Knowing your cap’s material helps you choose the best cleaning method.
Extra Insights Beginners Miss
Many new cooks don’t realize that:
- Water left on burner caps after cleaning can cause instant rust, especially on cast iron.
- Not cleaning the holes under the cap can cause weak or noisy flames, even if the top looks clean.
- Replacing just the cap (not the whole burner) often solves many stove problems cheaply.
These small details make a big difference over time.
Where To Find More Information
If you need specific advice for your stove model, check the manufacturer’s website or your user manual. Brands like GE, Whirlpool, and Samsung offer online guides and videos. For a deep dive into safe kitchen cleaning, see this helpful resource from Consumer Reports.
Frequently Asked Questions
Why Does My Burner Cap Turn Black After Cooking?
Cooking can cause grease and food to burn onto the cap, making it turn black. High heat and oil splatters are the main reason. Regular cleaning prevents buildup and keeps the cap looking clean.
Can I Put Burner Caps In The Dishwasher?
Some enamel-coated burner caps are dishwasher safe, but cast iron and plain metal caps are not. Dishwasher detergents can cause rust or damage. Always check your stove’s manual before putting caps in the dishwasher.
What If My Burner Flame Is Yellow Or Orange After Cleaning?
A yellow or orange flame means the burner cap or holes may still be blocked. Check for leftover grease, food, or water. Make sure the cap is seated flat and dry. If the problem continues, check the burner head or call a professional.
How Do I Know If My Burner Cap Needs To Be Replaced?
Replace the burner cap if it’s cracked, bent, has peeling enamel, or will not clean up even after soaking and scrubbing. Also, replace if the flame stays weak or uneven after cleaning.
Is It Safe To Use Oven Cleaner On Burner Caps?
Oven cleaner is strong and can damage enamel or leave unsafe residues. Only use if the stove’s manual says it’s safe, and rinse very well. For most caps, baking soda and vinegar are safer and just as effective.
A clean stove is a happy stove. By giving your gas stove burner caps regular care, you’ll enjoy safer, faster, and better cooking every day. With the right tools and a little time, anyone can keep their kitchen running smoothly.