To stop air from leaking around a door, install weatherstripping and use a door sweep. Sealing gaps with caulk also prevents air leaks.
Drafty doors not only make your home uncomfortable but also lead to higher energy bills. Addressing these leaks can improve your home’s energy efficiency and reduce costs. Properly insulating your door keeps the desired temperature inside and the elements out, enhancing overall comfort.
Weatherstripping, door sweeps, and caulking are the main tools for this job. They are readily available at hardware stores and are relatively easy to install. Checking for leaks regularly and maintaining seals is crucial for ongoing energy efficiency. A well-insulated door contributes to a greener home by reducing the workload on heating and cooling systems. Making these simple adjustments not only saves money but also promotes a more sustainable living environment.

Credit: hvac.ninja
Initial Signs Of Air Leakage
Feeling a sudden chill near the door? It might be air sneaking in. Let’s explore some telltale signs that your door might be the source of a draft.
Drafts And Breezes Detection
Place your hand near the door’s edges. Feel for moving air when the door is closed. Light a candle and watch the flame. If it flickers, air is escaping.
- Cold spots around the door frame suggest a draft.
- Check for visible gaps in daylight.
Increased Energy Bills
An unexpected spike in your energy bill may indicate poor insulation. Doors play a big part. Leaky doors force heating systems to work harder, increasing bills.
| Month | Energy Bill | Change |
|---|---|---|
| June | $80 | No Change |
| July | $85 | Minor Increase |
| August | $150 | Sharp Increase |
Compare bills from similar months. Look for unusual patterns.
Common Causes Of Air Leaks
Do you feel a draft coming from your door? You’re not alone. Many people face this issue, especially during colder months. Let’s explore the common causes of air leaks around doors. Knowing these causes can help you fix the problem quickly.
Worn Weatherstripping
Weatherstripping is like a door’s coat. It keeps cold air out. Over time, this coat can get old and torn. When it does, cold air sneaks in. Check your door’s weatherstripping. Look for any signs of wear or damage. Replacing old weatherstripping is easy and cost-effective. It’s a simple step towards a warmer home.
Door Misalignment
Doors can get out of line. This happens from use over time. A door not properly aligned will have gaps. These gaps let in unwanted air. Check if your door hangs straight. You can do this by looking at the gaps around the door when it’s closed. Uneven gaps mean a misaligned door. Adjusting the hinges may solve this. In some cases, professional help might be needed.
Remember, stopping air leaks is not just about comfort. It also saves on energy bills. A well-sealed door keeps the warm air inside. This means your heating system works less. Less work for the heater means less money spent on energy.
Tools And Materials Needed
Stopping air leaks around doors saves energy and money. Before you start, gather the right tools and materials. This will make the process smooth and efficient. Below is a detailed list of what you’ll need.
Weatherstripping Types
Choose the right weatherstripping for your door. Each type serves a specific purpose.
- V-strip or tension seal: Fits against the side of a door.
- Felt: Affordable and easy to install.
- Foam tape: Has adhesive backing for easy application.
- Door sweep: Seals gap under the door.
Sealants And Caulking
Sealants and caulking block air from escaping. They also prevent water damage.
- Silicone-based caulk: Durable and flexible.
- Acrylic latex caulk: Paintable and easy to clean up.
- Caulk gun: For precise application.
| Tool/Material | Purpose | Recommended For |
|---|---|---|
| Measuring tape | Measure door and frame | All doors |
| Utility knife | Cut weatherstripping | Custom fits |
| Screwdriver | Install door sweeps | Wooden doors |
| Hacksaw | Cut metal strips | Metal doors |
With these tools and materials, you can start sealing your door. This will improve home insulation and reduce energy bills.

Credit: info.betterdoor.com
Step-by-step Inspection
Doors are crucial in keeping homes energy-efficient. Air leaks can undermine this, leading to higher energy bills and discomfort. A proper step-by-step inspection can seal these leaks effectively. Let’s dive into how to identify where air is escaping from your door.
Visual Examination
Start with a close look at your door. Check for obvious gaps or cracks in the following areas:
- Door edges: The vertical sides where the door meets the frame.
- Threshold: The bottom part of the door frame.
- Weatherstripping: The material around the door’s perimeter.
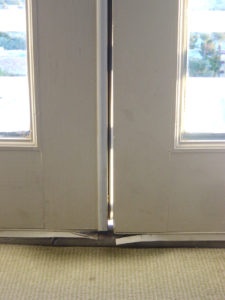
Look for signs of light passing through. Sunlight shining through indicates a potential air leak. Also, check for worn or damaged weatherstripping as it can be a common culprit for leaks.
Smoke Test For Airflow
For a more precise detection, use the smoke test. Follow these steps:
- Shut all windows and doors to create a controlled environment.
- Turn off all combustion appliances to avoid interference.
- Light a stick of incense or a candle.
- Slowly move it around the door edges.
Watch the smoke closely. If it wavers or is drawn toward or away from the door, there’s airflow. This method reveals even small, hard-to-see leaks.
By using these methods, you can identify where your door needs attention. Fixing these leaks improves home comfort and saves on energy costs.
Removing Old Weatherstripping
Before sealing those drafts, removing old weatherstripping is key. It’s like preparing a canvas for painting. Old, worn-out weatherstripping makes doors leaky, letting air in and out. Let’s get started on how to remove it the right way.
Clean And Prep The Surface
Cleaning is crucial. A clean surface ensures new weatherstripping sticks well.
- Inspect the door frame for old weatherstripping.
- Use a putty knife to gently scrape off residue.
- Wipe the surface with soapy water or rubbing alcohol.
- Let it dry completely before applying new weatherstripping.
Proper Removal Techniques
Removing old weatherstripping carefully is important. It prevents damage to the door frame.
- Peel off the weatherstripping slowly. Start from one end.
- If it’s stuck, use a hairdryer. Warm air loosens the adhesive.
- Avoid using sharp objects. They can scratch the door frame.
- For stubborn areas, dab with adhesive remover. Wipe clean.
Installing New Weatherstripping
Old weatherstripping can lead to air leaks and energy loss. Replacing it is a simple task. Follow these steps for a snug, energy-efficient door.
Measuring And Cutting
- Measure your door’s perimeter.
- Buy the right length of weatherstripping.
- Use sharp scissors or a knife.
- Cut the strips to match each door side.
- Ensure cuts are straight for a perfect fit.
Securing In Place
Clean the door frame before installation. Remove old adhesive and debris for a strong bond.
- Peel the backing off the strip.
- Press firmly along the door frame.
- Start from the top, then sides for alignment.
- Check for gaps, press down any loose ends.
- Close the door to test the seal.
A tight seal means successful installation. Enjoy your cozy, draft-free home!
Additional Sealing Tactics
Additional Sealing Tactics play a crucial role in stopping air leakage around doors. Even after applying weatherstripping, some gaps may persist. To address these, specific solutions can enhance door sealing. Let’s explore effective methods to further air-proof your door.
Door Sweeps And Thresholds
Door sweeps attach to the bottom of your door. They brush against the floor to seal gaps. Thresholds sit at the bottom of the door frame. They help to close the space between the door and the floor. Together, they prevent air from sneaking in.
- Choose a door sweep that matches your door’s width.
- Measure the gap under the door before buying a threshold.
- Install easily with simple tools like a screwdriver or drill.
Use Of Door Snakes
Door snakes are fabric tubes filled with insulating materials. They block drafts coming in from under the door. They are a quick fix and can be homemade or store-bought.
- Place the door snake against the bottom of the door.
- Ensure it fits snugly with no space for air to enter.
- Remove it easily when you need to open the door.
Maintenance And Upkeep
Keeping the warm air in and the cold air out is crucial. Regular door maintenance helps achieve this. Let’s explore how to ensure a snug, energy-efficient home.
Regular Checks
Inspect your door routinely for drafts. Feel for air movement. Look for light seeping through cracks. These are signs of leaks.
- Check weatherstripping for damage.
- Examine door sweeps for wear and tear.
- Assess hinges and tighten if loose.
Clean seals with soapy water. Dirt buildup can cause gaps. A clean seal is a tight seal.
When To Replace Seals
Not all seals last forever. Watch for these signs:
| Sign | Action |
|---|---|
| Cracks in the seal | Replace immediately. |
| Seal feels hard | Get new, flexible seals. |
| Sticky or deformed | Time for a change. |
Measure your door before buying seals. This ensures a perfect fit.
Enhancing Door Insulation
Keeping homes cozy and energy-efficient is a priority. Effective door insulation is key. It prevents air leaks and reduces energy bills. Let’s explore how to enhance door insulation.
Insulating Foam
Insulating foam seals gaps. It’s easy to apply and cost-effective. Here’s how to use it:
- Clean the door frame.
- Measure the gap size.
- Choose the right foam size.
- Apply the foam carefully.
- Let it expand and dry.
Insulating foam comes in sprays and strips. Both work well. Strips are best for larger gaps.
Energy-efficient Doors
Energy-efficient doors can save money. They keep heat in and cold out. Consider these options:
| Door Type | Benefits |
|---|---|
| Fiberglass | Durable and insulates well |
| Steel | Energy-efficient and secure |
| Wood | Classic look and natural insulation |
Consider upgrading to these doors. They have built-in insulation. They last long and look great.

Credit: m.youtube.com
Professional Help Or Diy
Deciding between professional help or DIY for stopping air leaks around a door is crucial. Each option has benefits. Understanding when to call a professional and when to tackle the issue yourself is key.
When To Call A Professional
Some situations require a professional’s touch. Here are signs you need expert help:
- Large gaps that simple fixes can’t cover.
- Structural damage to the door or frame.
- High energy bills, suggesting severe leaks.
Professionals can offer long-term solutions. They ensure the job is done right.
Diy Installation Tips
Many air leaks can be fixed without expert help. Follow these DIY tips:
- Inspect the door for gaps and cracks.
- Choose the right materials like weatherstripping or door sweeps.
- Seal gaps with caulk or foam.
- Install the weatherstripping or door sweep.
DIY fixes are cost-effective. They improve your home’s insulation quickly.
Frequently Asked Questions
What Causes Door Air Leaks?
Air leaks around a door can result from worn-out weather stripping, poor insulation, or gaps between the door and frame.
How Do You Detect Door Air Leaks?
Feel for drafts near the door edges or use a smoke pen to visibly detect air flow indicating a leak.
What Materials Fix Door Air Leaks?
Weather stripping, door sweeps, foam tape, and caulking are effective materials for sealing air leaks around doors.
Can Door Leaks Increase Energy Bills?
Yes, door leaks can lead to higher energy bills by allowing conditioned air to escape, increasing HVAC workload.
Is It Hard To Seal A Leaky Door?
Sealing a leaky door is generally a simple DIY task that can be accomplished with basic tools and the right materials.
Conclusion
Sealing air leaks around your door is simpler than you might think. With the right tools and a bit of effort, you can enhance your home’s energy efficiency and comfort. Remember, tackling those drafts not only saves on heating and cooling costs but also contributes to a more sustainable environment.
Start today and feel the difference.

