A good pan is more than a kitchen tool—it’s part of every meal you cook. If you own a Hexclad pan, you know it’s not just another nonstick skillet. Hexclad’s hybrid design brings together stainless steel and nonstick technology, making it both unique and powerful. But to get the most from your Hexclad, you need to season it right. Many people think nonstick pans never need seasoning, but Hexclad is different. Seasoning your pan means better cooking and longer life for your investment.
You might have heard that seasoning is just for cast iron or carbon steel. That’s not true. Hexclad pans have a special surface that works best when seasoned. If you skip this step, you might find food sticking, or your pan could lose its nonstick power too soon. Seasoning is a simple process, but it’s easy to get wrong if you don’t know the details. In this guide, you’ll learn exactly how to season a Hexclad pan, why it matters, and how to keep your pan working like new for years. I’ll also share some common mistakes to avoid—plus a few pro tips most beginners miss.
Let’s get started with everything you need to know about seasoning your Hexclad pan.
What Makes Hexclad Pans Unique?
Before you season your Hexclad, it helps to understand what sets it apart from other pans. Hexclad pans are a hybrid—part stainless steel, part nonstick. The cooking surface has a laser-etched hexagonal pattern. The raised areas are stainless steel, while the valleys are coated with a high-quality, PFOA-free nonstick material.
This means you get the searing power of stainless steel and the easy cleanup of nonstick—all in one pan. But there’s a catch: the nonstick valleys need a little help to reach their full potential. That’s where seasoning comes in.
Key features of Hexclad pans:
- Hybrid surface (stainless + nonstick)
- Laser-etched hexagonal design
- Works with induction, gas, and electric stoves
- Oven safe up to 500°F (260°C)
- Dishwasher safe (but handwashing is better)
Because of this hybrid surface, Hexclad pans don’t behave exactly like traditional nonstick or stainless pans. Seasoning them creates a layer of oil in the valleys, boosting the nonstick effect and making the pan easier to clean.
Why Seasoning Matters For Hexclad Pans
Some people wonder, “Is seasoning really needed?” The answer is yes—especially if you want your Hexclad pan to stay nonstick and last a long time.
Benefits Of Seasoning
- Better nonstick performance: Seasoning fills the valleys with a thin layer of polymerized oil. This helps food release more easily, especially sticky foods like eggs.
- Easier cleaning: Seasoned pans are much simpler to wipe clean. Burnt bits and stubborn stains are less likely to stick.
- Longer pan life: A well-seasoned pan protects the nonstick valleys, reducing wear and tear.
- Improved food flavor: Proper seasoning means less sticking and burning. Your food tastes better and looks better.
- Reduced oil use: A seasoned Hexclad pan needs less oil or butter for cooking, making your meals healthier.
What Happens If You Don’t Season
If you skip seasoning, you may notice these problems:
- Eggs and pancakes stick in spots
- Nonstick coating wears out faster
- Cleaning takes longer and needs scrubbing
- Food develops burnt spots or uneven color
Some beginners think their pan is defective if food sticks. Usually, they just missed the seasoning step. Proper seasoning fixes most issues.
Credit: www.reddit.com
What You Need To Season A Hexclad Pan
Seasoning a Hexclad pan is simple, but you need the right tools and materials. Here’s what you’ll need:
- Hexclad pan (clean and dry)
- Cooking oil with a high smoke point (see table below)
- Paper towels or a clean, soft cloth
- Stovetop (gas, electric, or induction)
- Tongs (optional, for safety)
Best Oils For Seasoning
Not all oils work the same for seasoning. The best oils have a high smoke point, so they don’t burn or create sticky residue. Here’s a quick comparison:
| Oil Type | Smoke Point (°F) | Seasoning Quality | Availability |
|---|---|---|---|
| Grapeseed oil | 420 | Excellent | Common |
| Avocado oil | 520 | Excellent | Moderate |
| Canola oil | 400 | Good | Very common |
| Vegetable oil | 400-450 | Good | Very common |
| Sunflower oil | 450 | Good | Common |
| Olive oil (refined) | 465 | OK | Very common |
| Butter | 350 | Poor | Very common |
Grapeseed oil and avocado oil are top choices. They create a hard, even layer and don’t leave sticky spots. Avoid butter or unrefined oils, as they can burn and make the pan sticky.
Step-by-step Guide: How To Season A Hexclad Pan
Let’s walk through the full process. Follow these steps closely for best results.
1. Wash And Dry The Pan
Even if your pan is new, wash it with warm, soapy water. This removes any factory residue or dust. Rinse well and dry completely with a towel. Do not skip drying—water can prevent oil from bonding to the surface.
Pro tip: If you have an older pan with stuck-on food, use a non-abrasive sponge. Avoid steel wool, which can scratch the surface.
2. Heat The Pan
Place your clean, dry Hexclad pan on the stove. Turn the heat to medium-low. Let the pan warm up for about 1-2 minutes. The goal is to open the metal’s pores so the oil bonds better.
Insight: Many people overheat their pans, which can burn the oil and ruin the seasoning. Medium-low is best.
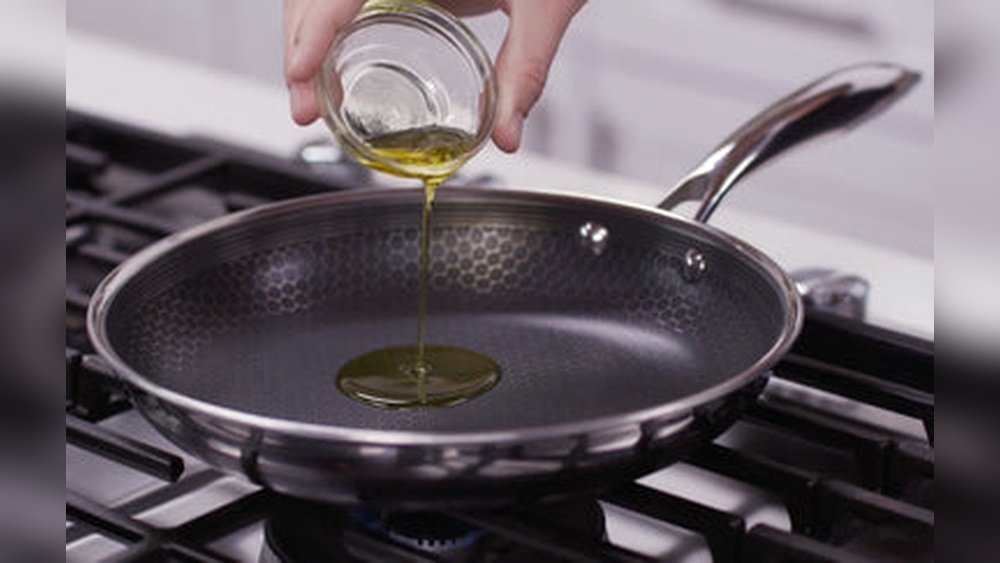
3. Add Oil
Pour about 1 teaspoon of your chosen oil into the center of the pan. This is enough to cover the whole surface with a thin layer. You don’t need more—extra oil just makes a sticky mess.
Non-obvious tip: Too much oil leads to gummy spots. Thin and even is always better.
4. Spread The Oil
Use a folded paper towel or a clean cloth to spread the oil over the entire cooking surface. Make sure to cover all the valleys and edges. If you use your fingers, be careful—the pan is hot.
Safety tip: If you’re worried about burns, grip the paper towel with tongs.
5. Heat The Oiled Pan
Let the pan heat on medium-low for 2-3 minutes. You may see the oil shimmer or lightly smoke—this is good. The oil is bonding to the surface, creating the nonstick layer.
Warning: If the oil smokes heavily or turns dark, your heat is too high. Turn down the burner.
6. Wipe Off Excess Oil
After heating, turn off the stove. Use a clean paper towel to wipe away any extra oil. You want a very thin, almost invisible film left behind.
Beginner mistake: Leaving puddles of oil will make the pan sticky, not nonstick.
7. Let The Pan Cool
Allow the pan to cool completely before storing or using. This helps the seasoning set and makes the pan safe to touch.
Now your Hexclad pan is ready to use! The first few times you cook, try foods with a little fat (like bacon or sausage) to build up more seasoning.
How Often Should You Season A Hexclad Pan?
Many people ask if seasoning is a one-time job. The truth is, the first seasoning is the most important, but regular maintenance keeps your pan at its best.
Recommended Seasoning Schedule
- First time: Always season before the first use
- After deep cleaning: If you scrub with soap or a scouring pad, re-season
- Every few months: Lightly season every 2-3 months for best results
- If food starts sticking: Re-season as needed
Non-obvious insight: Frequent light seasoning is better than rare, heavy seasoning. It’s faster and keeps your pan smooth.
Signs Your Pan Needs Re-seasoning
- Food starts to stick more than usual
- The surface looks dull or patchy
- Oil no longer beads on the surface
If you notice these signs, follow the seasoning steps again.
Maintaining Your Seasoned Hexclad Pan
Seasoning is not a one-and-done process. Caring for your pan keeps it performing like new.
Daily Cleaning Tips
- Let the pan cool before washing.
- Use warm water and a soft sponge. Mild soap is okay, but avoid harsh detergents.
- Dry completely with a towel.
- If you need to scrub, use a nylon brush—not steel wool.
Pro tip: Never soak your Hexclad pan for hours. Long soaking can weaken the nonstick valleys.
Storing Your Pan
- Store in a dry place
- Avoid stacking heavy pots directly on top (use a pan protector or towel)
- If you see rust spots (rare), wipe with oil and re-season
Restoring A Damaged Seasoning Layer
If your pan gets sticky, stained, or loses its nonstick power, don’t worry. Just wash thoroughly, scrub gently, and repeat the seasoning steps. Most Hexclad pans recover well, even after accidents.

Credit: www.amazon.com
Common Mistakes To Avoid When Seasoning Hexclad Pans
Many beginners run into problems because they miss small details. Here are the most common mistakes—and how to avoid them.
1. Using Too Much Oil
Adding too much oil is the most frequent error. It creates a sticky or uneven surface. Always use a thin layer.
2. Using Low-smoke-point Oils
Oils like butter or unrefined olive oil burn easily, leaving behind a sticky film. Use high-smoke-point oils for best results.
3. Skipping The Pre-heating Step
Pre-heating the pan helps the oil bond to the surface. Don’t rush this step.
4. Not Drying The Pan Before Seasoning
Water prevents oil from sticking and can even cause rust in rare cases. Dry the pan fully before adding oil.
5. Overheating The Oil
If you see heavy smoke or a burnt smell, your heat is too high. This damages the nonstick layer.
6. Storing The Pan While Still Wet
Moisture can lead to rust or damage the seasoning. Always store your Hexclad pan dry.
7. Not Re-seasoning After Deep Cleaning
If you use steel wool, the dishwasher, or strong soap, you may strip the seasoning. Always re-season after deep cleaning.
How Seasoning Affects Cooking Performance
A well-seasoned Hexclad pan transforms your cooking. Here’s how seasoning impacts daily kitchen tasks:
Searing And Browning
A seasoned Hexclad pan gives you the browning power of stainless steel with the ease of nonstick. You can get a great crust on steak, chicken, or vegetables without sticking.
Cooking Eggs And Pancakes
Eggs are the ultimate nonstick test. In a seasoned Hexclad pan, eggs slide out with little or no sticking—even with minimal oil. Pancakes cook evenly and turn easily.
Deglazing And Sauces
Thanks to the stainless steel ridges, you can deglaze the pan for pan sauces. Seasoning helps prevent burnt bits from sticking, giving you more flavor in your sauce.
Healthier Cooking
Because seasoning boosts the nonstick effect, you can use less oil or butter in daily cooking. This is a hidden health benefit many users don’t realize.
Cleaning After Cooking
Food residue wipes out easily with a paper towel or sponge. Heavy scrubbing is rarely needed.
Comparing Hexclad Seasoning To Other Pan Types
People often ask how Hexclad compares to cast iron, stainless steel, or classic nonstick pans. Here’s a quick side-by-side:
| Pan Type | Needs Seasoning? | How Often? | Difficulty Level | Nonstick Quality |
|---|---|---|---|---|
| Hexclad | Yes | First use, then every few months | Easy | Excellent (if maintained) |
| Cast Iron | Yes | Regularly | Moderate | Good to Excellent |
| Stainless Steel | No (optional) | N/A | Easy | Low to Medium |
| Classic Nonstick (Teflon) | No | N/A | Very easy | Excellent, but short lifespan |
Hexclad pans combine the best of both worlds, but seasoning is what unlocks their full potential.
Advanced Tips For Seasoning Like A Pro
Want to go beyond the basics? Here are some expert secrets to get even better results.
Double Seasoning
If you use your Hexclad pan for sticky foods (like eggs) every day, consider seasoning twice in a row. After the first seasoning, let the pan cool, then repeat the oil and heating step. This builds a stronger nonstick layer.
Oven Seasoning
Some users prefer to season their Hexclad pan in the oven. After applying oil, place the pan upside down on the oven rack at 400°F (204°C) for 30 minutes. Let it cool in the oven. This method creates an even, hard layer.
Note: Always check Hexclad’s official instructions before using the oven method.
Using Flaxseed Oil
Flaxseed oil creates one of the hardest, most durable seasoning layers, but it’s more expensive and can be tricky for beginners. If you try it, use a very thin layer and don’t overheat.
Spot-seasoning
If only part of your pan loses its nonstick power (like the center), you can season just that area. Apply a tiny bit of oil and heat as usual.
Avoiding Acidic Foods After Seasoning
For the first few uses, avoid cooking very acidic foods (like tomato sauce or vinegar-based dishes). Acid can strip the new seasoning. After a few uses, your pan will be more resistant.
Troubleshooting: Fixing Common Seasoning Problems
Even if you follow all the steps, you might run into issues. Here’s how to solve the most common seasoning problems.
Sticky Or Gummy Surface
This usually means you used too much oil or didn’t heat the pan long enough.
Solution: Wash the pan with warm, soapy water. Dry, then re-season with a thinner oil layer.
Patchy Or Uneven Seasoning
If the surface looks blotchy or some areas still stick, the oil layer may not be even.
Solution: Wipe the pan with oil, then buff off all excess. Heat as usual. Repeat if needed.
Food Still Sticks
If food sticks even after seasoning, the pan may need another round. Some new pans take 2-3 seasonings to reach peak performance.
Solution: Repeat the seasoning steps. Also, try cooking fattier foods for the first few uses.
Black Or Burnt Spots
Overheating oil or letting food burn can leave marks.
Solution: Gently scrub with a nylon brush and re-season the pan.
How To Tell If Your Seasoning Is Working
After seasoning, your Hexclad pan should show these signs:
- Food releases easily, even with little oil
- The surface has a soft sheen, not sticky or greasy
- Cleaning takes seconds, not minutes
- Water beads and runs off the pan
If you don’t see these results, check your process and try again. Seasoning is forgiving—mistakes are easy to fix.
Real-world Examples: Seasoning Success Stories
Many home cooks and chefs swear by Hexclad pans—but only after learning to season them properly.
Example 1: The “egg Test”
A beginner bought a Hexclad pan for scrambled eggs. First try: the eggs stuck badly. After a proper seasoning (grapeseed oil, thin layer, medium-low heat), the same eggs slid out with no residue.
Example 2: Sticky Stir-fry
A user tried making stir-fry in an unseasoned Hexclad pan. Soy sauce and vegetables burned in places. After seasoning, they noticed an even, golden color and easy cleanup.
Example 3: Busy Home Kitchen
A family used their Hexclad pan daily. They washed it with soap every time and lost the nonstick effect after two months. A quick re-season restored the pan to like-new condition.
Insight: Most problems come from skipping seasoning or cleaning too harshly. A little care goes a long way.
Frequently Asked Questions
How Long Does The Seasoning Process Take For A Hexclad Pan?
The actual seasoning process takes about 10 to 15 minutes from start to finish. This includes washing, drying, oiling, heating, and cooling. The pan is ready to use as soon as it’s cool. For deeper seasoning, you can repeat the process, but each round only adds a few extra minutes.
Do I Need To Season My Hexclad Pan After Every Wash?
No, you don’t need to season after every wash. Regular seasoning every few months is enough unless you scrub the pan hard or use strong soap. If you notice food starts sticking, it’s a sign to re-season.
Can I Use The Dishwasher After Seasoning My Hexclad Pan?
Hexclad pans are technically dishwasher safe, but using the dishwasher often will strip the seasoning and wear out the nonstick valleys faster. For best results, wash by hand with mild soap and a soft sponge. Reserve dishwasher use for deep cleaning, and always re-season afterward.
What Happens If I Use The Wrong Oil For Seasoning?
Using the wrong oil (like butter or unrefined oils) can leave a sticky, uneven layer instead of a smooth nonstick surface. If this happens, simply wash the pan, dry it, and re-season with a high-smoke-point oil such as grapeseed or avocado oil.

Credit: hexclad.com.au
Where Can I Find More Tips And Resources About Hexclad Pans?
You can find more details and official instructions on the Hexclad official website. They offer videos and troubleshooting guides for all Hexclad products.
A well-seasoned Hexclad pan is one of the most versatile tools in any kitchen. With a little care and the right technique, you’ll enjoy easy cooking, quick cleaning, and delicious meals for years to come. Remember, seasoning is a simple step that makes a big difference.
Happy cooking!